Article By Bryan Catley and his Alligator Lines Copyright ©
Ballasting the track is one of the most commonly discussed and written about topics in all of model railroading. Many do not do it because they perceive it as too time consuming and complex for them; others wait until the end and then do it section by section until it has been finished; others do it piece by piece as they progress through the scenery aspects of their model railroad.
Note: Many people who use track with performed road bed (such as Unitrack) do not bother with ballasting. They consider it unnecessary or inappropriate. If you are in this camp, please reconsider, I have seen pictures of ballasted track of this type that will blow your socks off!
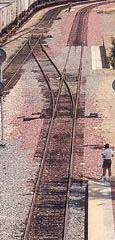
A recommendation for you: Look at lots and lots of prototype pictures. Note the style of ballast and above all the coloring. This becomes particularly important if you are modeling a specific geographic area. Only after this will you have an idea in your mind as to what colors YOU need to use! To wet your appetite, check out the pictures shown here. Then, check out the following link which provides you with, probably, the most comprehensive set of prototype pictures available anywhere: Prototype Rail Pictures
Go to lower half of the home page, complete the “Railroad Photo Search Engine” parameters and then press the “Find the Photos!” button.
For Alligator Lines I tackled the scenery aspect area by area and included the ballasting as part of completing each area. This saved doing it all at once, either before the rest of the scenery of after it. As with everything else it is really a personal decision as to which approach you follow.
Regardless, the steps remain the same and are discussed below. You may either scroll down through the page or click on an entry in the following list to go straight to that topic:
Painting the Track

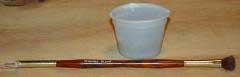
If you’re going to paint the track, it must be the first step! Much has been written about how to use ultra-fine paint brushes to carefully paint the inside and outside of the rails, about using a Q-tip to spread some Vaseline (or a similar product) along the top of the rails to prevent the paint from sticking there.
While I never concerned myself too much with colors I did start by buying some very thin paint brushes and then tried to follow the recommended procedures using some of the brown and gray paints I already had. For better or worse that didn’t last long!
I consider myself to be a reasonably patient person but I couldn’t cope with this! So, I just started painting. I had some brown rails and I had some gray rails; I had brown ties, some gray ties, some brown on gray ties and some gray on brown ties! When paint got on the rail heads I wiped it off with my finger or a piece of paper towel! Finally, I went over the track with one of those eraser-like track cleaners and all seemed to work just fine.
I’m sure a lot of people (especially the purists) are rolling their eyes at this point. Remember, however, I’m not modeling any prototype or era, I just to want to find out what works and what doesn’t work and, so far, this approach has worked well for me. It will not necessarily work for you. Experiment!
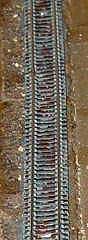
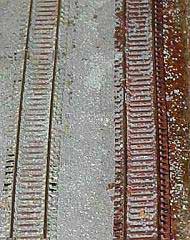
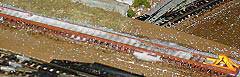
Of course, using this approach, the road bed around and between the ties has also received a healthy dose of paint as you can see from the pictures here! (But it will be covered with ballast – so it doesn’t matter). Just employ a reasonable level of patience make sure you have the correct choice of colors for rails and ties.
One final note: Be very careful when painting the turnouts. It is very, very easy to paint them only to find out, when the paint dries, they are stuck in one position! This did happen to me but, luckily, it was not too bad and I was able to use my fingers to break the seal and they now seem to work OK. If they really get stuck there will be no choice but to replace them! As a general rule, keep the paint away from the points, even if parts of the turnout remain unpainted. As you become more proficient you can expand your turnout painting efforts!
There are some tools available to help in track painting. Check out the following link for one of them. Rusty Rails Painter Tool
Selecting the Desired Ballast
This is actually a very important step. Besides choosing from several manufacturers you must also decide on a grade and color(s). You may also choose to make it yourself, if you wish (but that is beyond the scope of what we’re discussing here). Probably the two most commonly used products are from Woodlands Scenic and Scenic Express. Another popular supplier is Arizona Rock & Mineral Co. There are other suppliers as well but these are probably the best known.
So far as grade goes you will usually be choosing from fine, medium and coarse. For N Scale you will want to use fine in almost all cases (unless you have some special need or effect you wish to create).
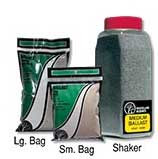
There are a real variety of colors available and you simply choose the colors that suit you the best! For Alligator Lines I initially purchased gray and black. The gray was for general use while the black (to be mixed with some of the gray) was for the steam engine servicing area. Subsequently I also purchased some brown and I may well end up buying additional colors (since I really don’t want to use gray throughout). I used Woodlands Scenic products but only because they are the only brand my Hobby Shop carries! The picture here shows the three sizes available from Woodlands Scenic.
If you’re modeling a prototype pick a color that is representative of that seen on the prototype tracks; if you’re modeling freelance or some combination you can be a little more flexible in the colors you use. Also, don’t ignore the coarser grades. You just may be able to use them to great advantage in specific areas!
Positioning the Ballast
The process of actually putting the ballast into place does need a little care since it is very easy to get it into places where you don’t want it and then it becomes quite difficult to remove! (Unless you use a vacuum, of course).
If you’re going to blend two or more colors, that’s the first thing to do. Make your blend and store it in a jar or other suitable container. To place the ballast on the track I use a small plastic cup (like the ones on cough syrup bottles) which I compress on one side to form a spout. From here I pour a small amount into place, either between the tracks or on the sides. I try to pour slowly as I slowly move the cup along the track. Only a small amount at a time!
Sometimes it comes out in a rush and I end up with a small mound! Not really a big deal but this does require some patience and if you have an area where you can practice so much the better. I didn’t have such an area and I jumped right into it. The very first area was, however, just inside a tunnel mouth (before installing the portal) so it was not out in plain sight!
Next I used a small make-up brush (one my wife had finished with) to smooth out the ballast and to brush it into all the places it needed to be. You don’t need to be heavy handed; a little ballast will go a surprisingly long way and will produce a neater appearance (once again, depending on the look you are after). I will also use my fingers where necessary and to good effect!
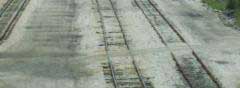
Note the difference shown in the picture above right. The left was a very early effort (when I was a little heavy handed) and the right is a much more recent effort (when I was a little more careful regarding the amount of ballast used). Neither is wrong and neither is right, it just depends on the desired effect! Further, I intentionally did not ballast the right side of the track and it will stay that way until I do the scenery in that area.
Note: I want to emphasis that last sentence. It is not necessary to ballast both sides of the track and the middle at one time. Often the middle can be done and the sides (one or both) can be left to be done as part of some scenery project.
When looking at pictures of ballast done by others, one of the things that often strikes me is the number of applications where the ballast extends so far out from the track as to look unnatural. Now I know why and how easy it is for that to happen no matter how careful you are! One method to keep this “spread” to a minimum is to use a little at a time and maybe go over the same area two, or even, three times. Also, when going back and touching up, don’t be afraid to use your thumb and finger and place the ballast down in “pinches” – works very well.
As with painting, be very careful around the turnouts. It is very easy to jam them up! Real railroads usually go very lightly with ballast for their turnouts and this is probably a good example to follow.
One question seen frequently is “should I do the scenery first and then add the ballast or should I do the ballasting first and then add the scenery?” As with everything else, it is a matter of personal choice. Many subscribe to the idea that in real life the “scenery” was there first so that’s how they do their modeling – scenery and then ballasting. That’s how I started but I’ve since changed my mind!
One thing I didn’t like was the way the ballast “spread” away from the track. I also found when I applied the glue, it soaked outwards into the scenery and left a darker band along the edge by the track. So I started doing it the other way around. I can now hide the ballast spread with scenery (example, grass and shrubs) and eliminate the glue soaking problem.
As with track painting, there are tools available to help you in applying the ballast. Here is one to check out: MLR Manufacturing Track Tool Sets. The ballast spreader is the third item on the page, but check out their other tools while you are there!
Soaking with “Wet Water”
“Wet Water” is ordinary water that has had some agent added to it to prevent surface tension from stopping the water from flowing freely. Examples of these agents are the photographic PhotoFlo solution and ordinary dishwashing detergent.
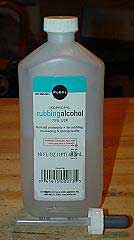
If the ballast is thoroughly soaked with this wet water it allows the glue solution to flow easily and soak into the ballast smoothly and evenly (provided you haven’t allowed it to dry in the mean time). Most people make wet water by adding a teaspoon or two of detergent to a quart or so of water. There is another alternative. Plain old rubbing alcohol! It works beautifully and while not as inexpensive as making your own, it’s so cheap that it really doesn’t matter!
Wet water or rubbing alcohol is usually applied using a spray (bottle) of some sort. Do this carefully because if you apply too much pressure you will “blow” your carefully formed ballast all over the place. To avoid this, many people actually spray upwards or over the ballast and then allow it to gently “rain” down thoroughly soaking it with out moving it.
I’m sure this works well but you also end up soaking everything else in the vicinity!
When it came time for me to try this I decided to try something different. The glue is applied with an eye/medicine dropper, so why not the wetting agent as well? This is what I tried and overall it has worked very well. The first attempt was made using a dropper that was a little big and I ended up flooding the ballast away from where it was supposed to be! I didn’t try that dropper again.
Instead I discovered we had two nice small ones left over from some pet medication. One got used for the water and the other was used for the glue. A combination of the smaller dropper and careful application worked really well and is certainly an approach I would recommend trying. Of course, you may find another method that works just fine for you!
Just remember, whatever method you use, the ballast needs to be wet when you apply the glue so don’t do too much at once.
Soaking with 50/50 White Glue and Water Solution
The ballast is actually held in place with a diluted solution of white glue and water. 50/50 is the usual ratio but I have read of both stronger and weaker solutions being used. Very often a shot of dish washing detergent is added as well to help with the easy flowing aspects of application.
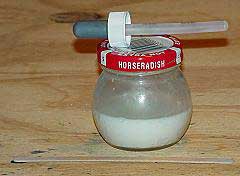
I mix mine in a small measuring cup (not one of my wife’s but one purchased specifically for this) and I mix half a cup at a time (using a Popsicle stick as a stirrer). I use the 50/50 mixture and also add a little detergent. Tip: White glue, it seems, mixes best with warm water rather than cold. Once the mixture is made I pour it into a small glass jar for keeping. Actually, this half cup goes quite a long way.
Note: Once in the jar the glue has a tendency to settle on the bottom so be sure you give the mixture a good stir before use. And make sure you stir (using the Popsicle stick) – shaking will not do the job!
The solution is applied using a small eye/medicine dropper. If you used a dropper for the wet water you can use this same one if you wish but I strongly recommend having two. It is really much more convenient!
Don’t be afraid of applying too much glue but do it slowly and carefully. It will soak through the ballast very nicely. Remember to do it while the ballast is still wet from the wet water. Oh yes, once, try applying it directly on dry ballast without the wet water. You’ll learn very quickly why the wet water is necessary! (It beads up and when it does eventually soak in it does so unevenly).
When you’ve finished, wash your glue dropper thoroughly. You don’t want the glue drying inside it!
After you’ve finished applying the glue to the areas you are ballasting you should turn you attention to something else. The glue will take several hours to soak in and dry and is, actually, best left overnight before anything else is done with that area.
Note: Just recently I read about someone who mixed the white glue 50/50 but directly with alcohol! He claims this approach negates the need for the wet water soaking step. I’ve not tried this method so I have no idea how effective it is. If it seems reasonable to you, try it. Remember, it is your railroad!
Make Sure Trains Still Run
When the glue has thoroughly dried, probably the next day, it is wise to make sure trains will still run over that area of the track! Paint or glue on the rail head (how on earth did that get there?) and ballast that is little thick in a couple of spots (my, my, did I do that?) can play havoc!
Brush or vacuum the area and then use your rail cleaner on the rail heads. Inspect visually to ensure all looks well and then try running an engine over the area! In all likelihood it will run just fine. If it doesn’t, take a closer look at the problem area to see what is going on. Still some stuff on the rail head? Use you rail cleaner again. Maybe a little bit of ballast in the wrong place? Try scrapping it away with a screw driver or something similar.
I have also read where the application of ballast has interfered with the electrical contacts. Touch wood, I’ve not had this problem so I can’t really comment on the best method of handling this rather nasty problem.
As you do each area your skills will improve in leaps and bounds and you’ll develop a “feel” for just the right amounts of whatever you are applying!
