Article By Bryan Catley and his Alligator Lines Copyright ©
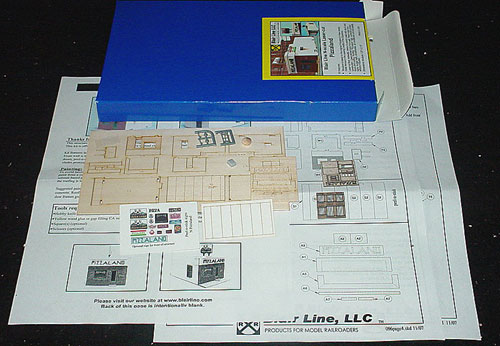
Blair Line Structure Laser Cut Kit #096 Pizzaland is a kit I have been looking at for awhile now. It was just a question of finding the right location on the layout! Now I have found it! It will probably be located on my laynext to Cricket’s Saloon, with an intervening parking area as part of Scenery Project 13 (Part D).
Here we will just discuss the kit and the actual construction of the building. A mix of CA and white glues, applied with a toothpick was used during construction.
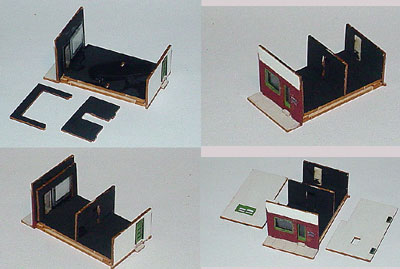
The kit is a fairly typical laser cut kit. It does include a couple of plastic pieces, something I have only come across in Blair Line kits. It employs tab and slot construction in several areas and includes a variety of peel ‘n stick trim pieces. This includes roofing stock for the roof and trims for the edges of the structure along with some signs. Laser cut glazing for the windows is provided along with burglar bars for the side window and back door.
Things like a vent for the roof and a wall air conditioner are also available as part of the kit.
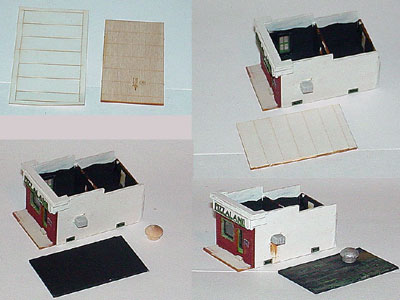
The footprint for the structure is approximately 2 1/4″ x 1 3/16″ which includes the 1/4 inch sidewalk in the front of the structure. The kit comes in a cardboard box that is quite large considering what is inside! The size is probably to accommodate the three standard-size sheets of instructions folded once across the middle!
The first sheet is a header with an introduction and some general painting tips. The reverse side is blank. The third side identifies all the individual pieces. Sides four to six comprise the bulk of the actual instructions and consist of illustrations and supporting text.
The Blair Line site for this kit is here http://www.blairline.com/pizzaland/.
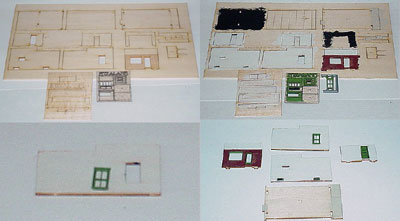
As is usual, the building is started by pre-painting the pieces before removing them from their holders. Remember that for this kit a number of the pieces require painting on both sides.
The walls were painted white and the trim was painted green. The brick base of the front wall was also painted red; the sidewalk received a concrete color.
Note: With this kit I tried something I hadn’t done before. Based on a suggestion in the instructions I painted the interior walls a flat black. Given the final location for the structure and the angle of view it probably wasn’t really necessary.
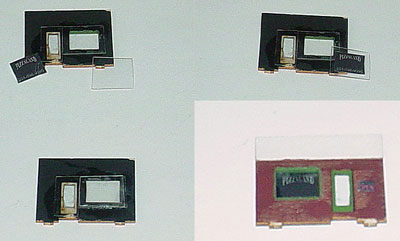
Actual construction is started by adding the windows and doors to the necessary walls. (Don’t forget the two vents at the bottom of the wall that contains the air conditioner). Next was the “glass”. I chose not to use the provided acetate, instead choosing the use some of the thicker acetate I had left over from an earlier kit.
Something else I chose to handle at this time was the front window sign. The instructions say to add this sign on the outside of the window towards the very end of constructions. Instead I made a sandwich of the sign between two pieces of acetate! I think it looks better than just having it in the outside of the window!
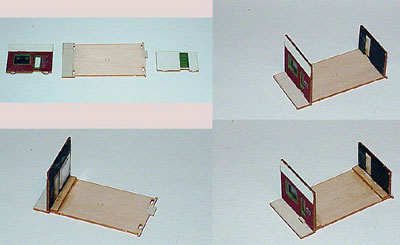
The actual structure itself was started by dry fitting the front and back walls to check out the tabs and slots. They worked but were a little on the tight side.
There are two small sub-floors that fit next to the two (front and end) walls. They each have a tab that slides under the doors to form a step for that door. Next is a backing interior wall for the front wall and this is followed by a full-sized sub-floor that fits between the walls which has two slots for an interior center wall.
Once the center (interior) wall is installed you have the perfect support for the roof that will ensure it is sloped at the correct angle. You also have a very sturdy (and relatively heavy) foundation for the overall structure.
Next were the two side walls and this was the first major issue I had with the kit. Yes, some of the earlier tabs and slots needed a little “adjusting” but the two side walls were simply too short! I thought at first it was my issue but since the front and back walls were placed with tabs and slots that didn’t make a lot of sense!
Not a lot short but short, none-the-less! I positioned the walls up against the front wall and worked with the rear wall hook-up! To do this I used some scrape wood (from earlier kits) to form some “corner posts” and then filled in the gaps with some joint compound applied sparingly with a toothpick!
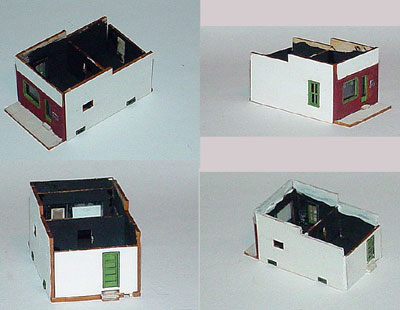
This actually worked quite well and once dry with some touch-up paint it looked quite respectable!
Note: If you have a situation such as this, bear in mind the positioning of the structure and the most likely angle of view. This could determine whether to work on the front or the back corners!
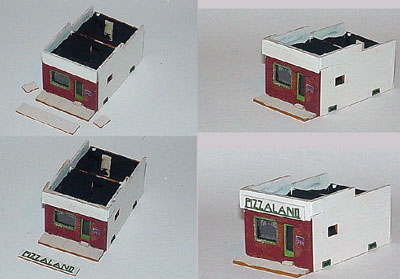
Next was the main Pizzaland sign in the front of the building and cornice for the front wall. The Pizzaland text was painted green and the whole area was constructed per the instructions.
Notes:
1. Watch out for the two small panels under the corners of the cornice. They should be installed vertically but it would very easy to install them horizontally!
2. The instructions indicate to install the roofing, the air conditioner and the side sign (with lamps) before doing all of this. I chose to leave these steps until after the main structure was completed.
At this point the main building was pretty much complete and it was time for the air conditioner (in my sequence of things).
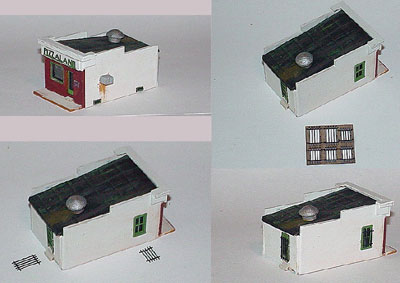
This presented a little bit of a problem in so far as the a/c unit was quite a bit smaller than the hole provided in the wall! In order to glue it into place some means had to be devised to hold it in position while the glue was drying. On top of this it was also going to be necessary to fill in the gaps around the unit!
After a try or two using my fingers I came up with a much better method. Using a small piece of masking tape on the inside of the wall (sticky side out) the a/c unit was inserted from the outside using the masking tape for both positioning and as a place holder. A small amount of glue held it in position and (once again) minimal amounts of joint compound, applied using a toothpick, filled in the gaps. A little touch up paint finished the installation! Once dry the masking tape was left in place.
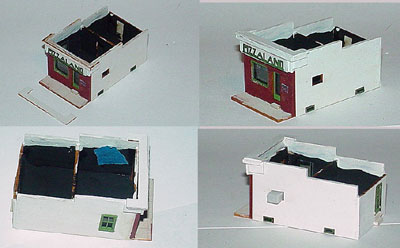
Next to be tackled was the actual roof. This is a single piece of wood inscribed with a number of lines and a marker as to which is the back end! Dry fit it first! Mine fit perfectly (despite the side walls).
Now apply the peel ‘n stick roofing strips to the base roof. Note that all the strips are of the same size except the one at the very back, which is also the first one to be applied. Using the inscribed markings as a guide apply the first strip. Note how it actually extends beyond the roofs end and that you need to fold the edge down for the correct effect.
Note: The roofing strips are of the exact required width. Do not vary when applying! It would have been nice if they had been made a little wider – trimming then would not be an issue!
You then work your way up the roof, strip by strip until the roof is completed. Remember that each strip overlaps the previous strip by a (very) small amount.
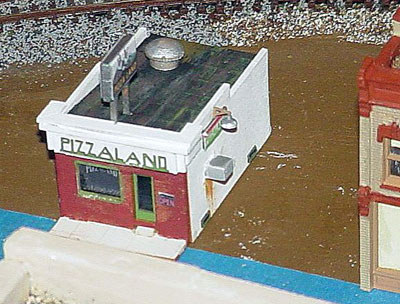
Once done I suggest painting and weathering the roof before placing it in position. I started with a grimy black and then dry brushed a couple of shades of gray along with a small amount of green over the roof.
The supplied roof vent was also painted an aluminum color and glued into a position towards the back of the building and to one side (about where I thought the stove might be)! The roof itself was then glued into position.
At this time I also adding some “rust” markings on the wall under the air conditioner.
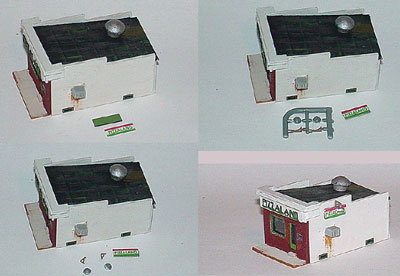
Following this, the burglar bars were painted black and then added to the side window and back door.
Note: As with Fred and Red’s four sets of bars are included but only two are required. Save the other two!
The burglar bars were followed by the side Pizzaland sign with its two lamps. The sign itself is straight forward; a peel ‘n stick sign and a piece of wood to mount it on! The lamps, as with Fred and Red’s come as a pair and each is made of two very small pieces (the mount and the shade).
As with Fred and Red’s I ended up loosing one of the small pieces so I (also) ended up with only one lamp! It doesn’t make a big difference and I doubt anyone would really notice it!
Note: Many of these kits provide extra pieces; this one, for example, provided extra burglar bars, so why not provide one or two extra of the tiniest features of the kit?
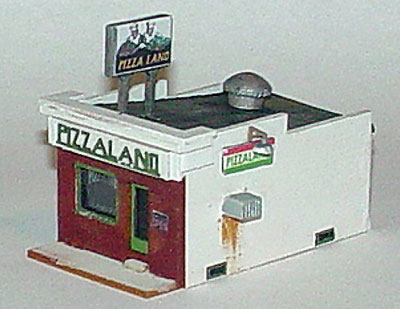
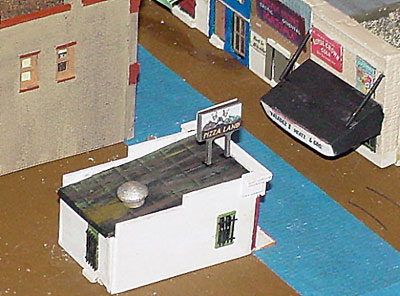
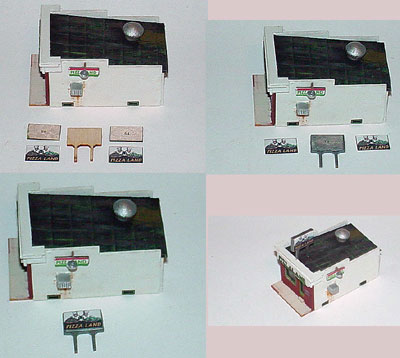
The final part of the structure was the roof mounted sign. This is really a very simple piece to put together. The main sign was painted aluminum and the side pieces, along with the peel ‘n stick signs, were glued into position.
Note: The length of the legs for the sign are designed to correspond to the slope of the roof!
A little rust was dry brushed on the roof behind the vent and the structure was completed.
The basic structure is a pretty straight forward build and the instructions provide much of the needed information although it is necessary to improvise on occasion. However, the kit also contains a number of small and delicate pieces that require special handling and the instructions are of very little help in this area. As such I’m not sure this is a good kit for a first time laser kit builder unless there is an extensive model building background there!
