Article By Bryan Catley and his Alligator Lines Copyright ©
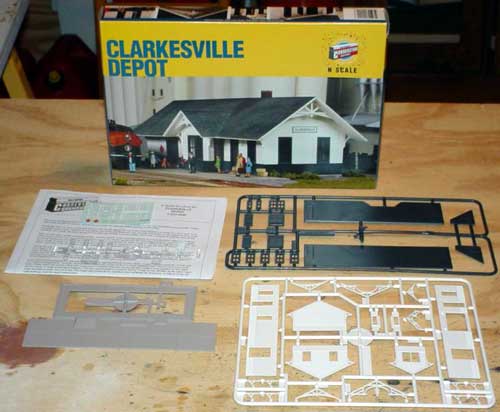
Cornerstone Clarkesville Depot
There isn’t a lot of space available for a main depot on Alligator Lines but I certainly didn’t want a very small depot that would be more in place on a small branch line. Initially I purchased the Atlas Passenger Station but the more I looked at it the more I decided it just wouldn’t look right in the setting I intended to use it. So, I ended up with the Cornerstone Clarkesville Depot by default!
It is just about the right size for my available space and the kit also comes with two sets of gables, one is an “eastern” style and one is a “western” style. The western style seems to be more of a match to my layouts overall appearance. For the most part the kit is pretty good but some pieces do not fit quite right and the instructions are a little short in places.
The kit has four sets of plastic parts attached to sprues of different colors. White for the walls, dormers and gables; dark-gray for the roof, window frames and doors; light gray for the platform and chimney and clear for the window pieces. Besides the instructions a sheet of decals is also provided.
When I opened the box the first time I found that a number of the “windows” had become detached and I thought, at first, that some were missing but they weren’t. Anyway, they all ended up in an envelope for safe keeping.
If you plan of painting your depot (and I have to believe you will), do it before you remove the pieces and start putting them together. Yes, you will have to do several touch-ups as you do the construction but it makes life so much simpler. Also, be prepared to use several coats before the pieces are ready to actually use. You don’t want to use a thick coat because you will hide the details but with thinner coats the color of the plastic tends to show through. (I suspect the number of coats needed may very well vary with brand of paint being used).
Remove the pieces from the sprues as they are needed. With this kit the first thing to do is place the window and door frames into the appropriate openings. They fit well, but still need a dab of glue to hold them securely in place. Just a small dab at each corner will do the trick.
Next come the windows but they don’t fit into anything; they just lay flat on the window frame! Use a thin blunt object (the handle of a paint brush, for example) to hold the “window” in place while you apply a couple of dabs of glue.
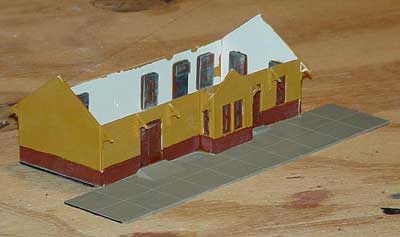
The instructions say to start putting the walls together at this point. But I deviated a little bit. I thought it might be easier to attach the dormers now rather than when the walls were all in place, so this is what I did. I guess it’s a personal preference but I think doing it this way, before the walls are set in place, makes the application of the dormers easier. Apply a very small amount of glue to the edge of the dormer and then use a pair of tweezers to put it in place. If you’re like me it will take several tries before you get it right and you will probably end up with more glue than you wanted. Time for the first touchup!
From this point the walls pretty much go together in a fairly straight forward manner. When putting them up hold them in place and put a small dribble of glue in the corners. I did have a little trouble getting one side of the bay-window in place but it worked out OK.
The roof has a couple of challenges though! While the pieces do have small, short “ribs” to guide you horizontally, there is nothing but your eye for the vertical alignment. If you end up being off the two main pieces will either overlap at the top or end up with a gap between them! There are also no top or bottom indications. The side over the bay widow is obvious (because of the cut out) but the other side is not. The only way is via the guidance ribs on the underside. They are at the top! I didn’t realize this until after I had glued them in place.
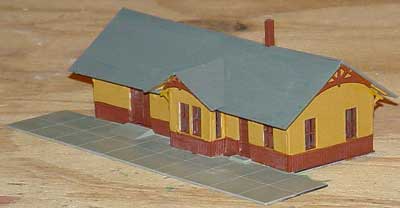
I also found the two smaller roof pieces for the bay-window came together at an angle that was larger than the angle at the top of the wall. I’m not sure if this was my problem or not, but it is rather obvious from a front-on view. However, where I will be using the depot this defect will be difficult to see. Lucky me!
Inserting the gables was also a little bit of a challenge simply because of where they go. A combination of fingers and tweezers eventually worked. There are only guidance ribs to place them up against and this ends up being a little tricky!
Anyway, as you can see, the end result is worth it all.
Some tips :
Painting first and touching up later makes life much easier. Use a very sharp modeling knife to remove the pieces from the sprues and then use a very fine piece of sandpaper to make sure the edges are smooth. Try to keep the amount of glue used to an absolute minimum. It is very, very easy to use too much and once there it is difficult to remove. Applying it with a toothpick dipped in a “puddle” of glue seems to work well. Once the glue has set, use that fine sandpaper to go over all the exterior joints so you have a nice smooth edge. You may have to do some paint touch-ups but it will be worth it. If you end up with some small gaps in the joints you can often fill them in with paint! Only use a little paint at a time and draw the brush across the gap (so the paint flows in). Be sure to smooth the edges and make sure you don’t obscure any of the details in that area with excessive paint.
