Article By Bryan Catley and his Alligator Lines Copyright ©
In general, resin kits appear to be very similar to plastic kits in that they look a little like a plastic kit and come attached to sprues just like the plastic ones. The big difference is that resin kits have most of the windows and doors molded right into the walls. The sprues also have a much stronger/thicker attachment. This means there are fewer pieces to be concerned about but it does make the painting job a little more challenging!
CA glue was used during construction often being applied with a toothpick.
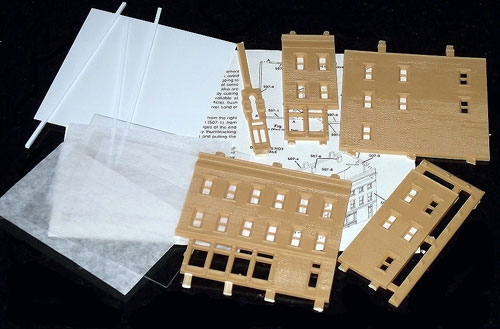
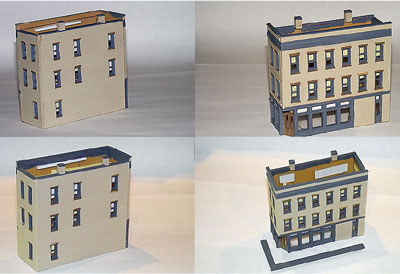
Like the other DPM kits, this one comes in a sealed plastic pouch and consists of a two page folded set of instructions and parts identifier along with the molded resin pieces still attached to their sprues and three pieces of acetate for the windows. It also includes a single piece of styrene for the roof and styrene roof supports. There are no main door side panels since the door connects directly with the walls.. All styrene pieces require trimming before use.
Note: This kit does not come with any signs or detail parts. You will need to supply these yourself and since the lower level is a shop some window signs might be very appropriate depending on how you plan to use this structure.
As has been indicated above, these kits have the windows and doorways molded into the basic walls of the structure! However, like many of these kits the main doorway is a separate piece because it is set back from the front corner of the structure. The rear door is molded into the sidewall.
One slight difference this kit has over most of the others is that it includes a roof cornice that goes around two of the walls.
The instructions are reasonably complete but seem to be general for all scales with some notes which are specific to the N scale version. They consist of both text and (drawn) pictures which show the recommended construction technique, plus they also serve to identify the parts.
As with most structure kits it is best to start by painting the walls and any detail pieces. However, with plastic and resin kits it is first necessary to remove the pieces from the sprues and clean any flashing. Do this only as you need the pieces.
Resin kits have another step; to aid in removing the pieces from the mold some of the wall ends are actually at a slight angle (rather than being square). It is necessary to sand these smooth and the instructions are very clear on which edges need this treatment. To insure a square finish hold the wall flush with square piece of wood (or something similar) and then run back and forth over some sandpaper.
Note: I have read many times, including in these instructions, that it is best to wash the resin pieces in warm, soapy water before doing any painting. I tried doing this with the previous kit but, to be honest, I didn’t notice any difference between this and the earlier kits where I did not wash the pieces first. As a result I did not bother washing this one, either!
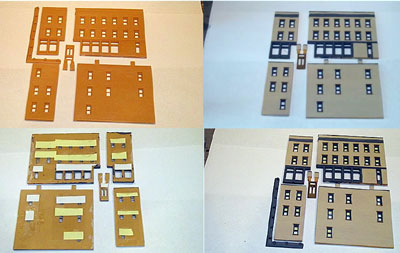
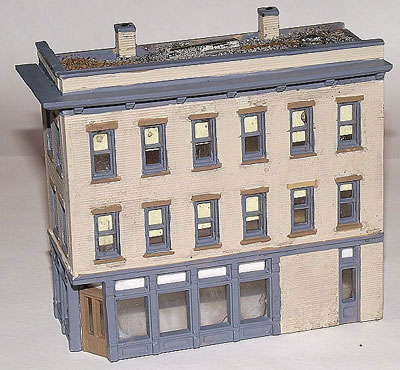
After deciding to follow the coloring scheme shown on the kit cover painting started. The window frames were the first areas to receive some paint. The upper and lower window sills along with the storefront were also painted. Both doors were painted as well.
Note: A very small brush was used for these small and detailed areas. Further, be sure your paint is not too thick. That could cause you a lot of issues! By the same token make sure it is not too thin either!
Before painting the main walls the building’s trim was also painted as were the two separate chimney pieces. This left the main “brick” walls to be painted. This was done starting with a small brush around the window areas and finishing with a somewhat larger brush. Once dry the inevitable touching up was performed!
Note: I have always painted the details and then the larger areas. Other modelers choose to do the larger areas first and end up with the details. Either method works! You just have to decide which works best for you!
The next step was to cut the acetate and glue it on to the back of the walls over the window areas. Some “window blinds” also seemed appropriate and they were cut from white and yellow “stickies” and positioned, after which a little glue was applied to hold them in place permanently.
Note: Remember to make the blinds of differing lengths!
Now this kit, like all the others, comes with several small strips of styrene to be used as roof supports. However, with all the others I have constructed there were four chimneys and I found these to work perfectly satisfactorily in supporting the roof. This structure, on the other hand, only has two chimneys so there was no option but to use at least one strip!
Since there was no indication of exactly where this strip should positioned it was necessary to figure this out for myself! The way I did this was to position the walls along the edge of a straightedge and draw a line at the correct position based on the bottom of the chimneys on the opposite wall.
An alternate method would be to carefully measure the distance from the bottom of the wall to the bottom of the chimneys and then to transfer this measurement to the opposite wall. Regardless of which method is used you should also take into account the thickness of the roofing styrene!
Now that the walls, chimneys roof support were finished it was time to start putting them all together.
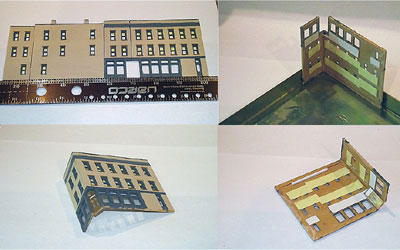
When gluing them the main thing is to be sure the bottom edges are flush and the corners are at right angles! This sounds relatively easy but you will require some kind of assistance to help you in achieving this. I used my Micro Mark Gluing Jig.
The first two walls are always the easiest (at least for me) while the second two walls require a little bit of extra care!
I started with the two walls that also house the doorway. When the two walls were glued the main door was then glued into position. It is much easier to do this now before all four walls are in place! Once all four walls are glued together the basic framework for the structure is in place.
Note: In the past I have always had an issue with getting all four walls aligned up perfectly, usually having to resort to using some filler to fill in some gaps. This time things went pretty well but not perfectly and some filler was necessary. Joint compound applied with a toothpick.
The roof was next and like the other kits it comes as a separate piece of styrene that you need to trim to the correct size.
To do this I placed the structure over the piece and drew an outline using the inside of the walls as a guide. The “roof” was then cut out with a pair of scissors. Make sure you dry fit it at this point to be sure it is of the correct size. If you goof there is enough left over for another try. Once done, it was painted a flat black.
The roof is pretty easy to install. It is inserted from the bottom of the building and fit up against the bottom of the two chimneys on one side and on the top of the previously installed roofing support on the opposite wall. From this point I added a thin bead of glue, from the underside, around the edges using a toothpick.
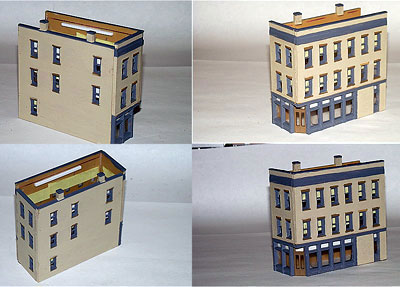
A vent and an AC unit were also added to the roof; not a part of the kit but I had them and decided to use them!
I had already decided to “gravel” the roof as I had done with some of the other kits and since they had turned out really nicely, I used the same technique but decided on a slight change. This time a small area of the roof was to be a different color indicating some repair work and re-graveling!
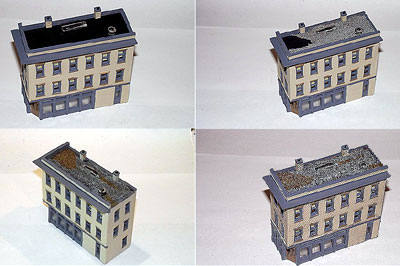
First thing I did was spread a little full strength white glue over the roof (not too much) except for the “new” area and then, using a decent soft paint brush, it was spread around to cover the area to be graveled. (The paintbrush then went into some water for some soaking). Before drying a minimal amount of a fine ballast was spread over the glue using the thumb and forefinger sprinkler. Once dry any excess (very minimal) was shaken off. A little weathering was then dry brushed onto the roof. Some black and brown.
The “new” area was then completed using the same technique but with a different colored ballast. No weathering was applied this time.
Some black wash was then applied to the walls but it is only really obvious in a few spots.
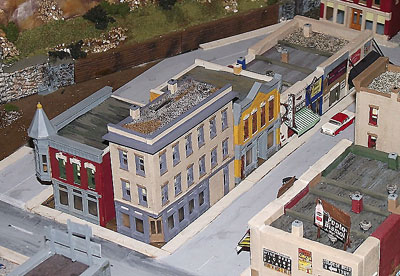
The structure was now complete but not necessarily finished. The storefront windows are quite large, making it easy to see the interior from certain angles. The instructions suggest cutting a piece of black craft paper to the correct size and inserting it diagonally inside the building. Depending on the location of the structure this could be a useful thing to do.
Note: Should you plan on lighting the structure (for some nighttime operation), you should also paint the interior a flat black and this should have been done back when you originally painted the walls. You can do it later but it would become a little more difficult.
As stated earlier some signs for these windows would also be appropriate.
