Article By Bryan Catley and his Alligator Lines Copyright ©
Walthers 933-3243 Al`s Victory Service
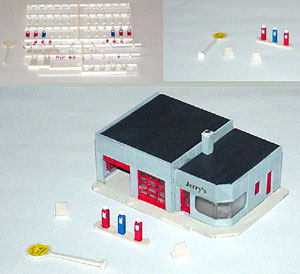
The Cornerstone Al’s Victory Service kit comes in cardboard box; the picture of the finished product is on a sleeve for the box and this sleeve is long gone! So to provide an idea of what the kit looks like here is a link to Mike Fifer’s product page for this kit to give you an idea of what the final product might look like: Al’s Victory Service.
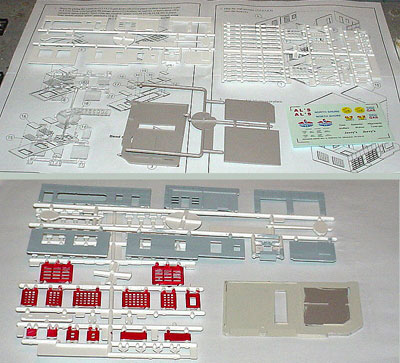
The kit pieces themselves are molded in white, gray and clear plastic. I suppose you might get away with not painting it but I am sure would want to paint the pumps if nothing else. Should you choose not to paint it you should, at the very least, give it a coat of Dull Cote to remove the plastic appearance (although this style of structure would be quite valid with a white shiny finish). A small sheet of decals is also provided which allow for several different owners and styles of signage.
The instructions come on four sides with the first side being a history of service stations (an interesting read in itself). The style of this one came into being in the 1930s and many can still be found today but in a modified form (thus, some kit bashing would be appropriate for a modern day layout).
The remainder of the instructions are a combination of drawings and text and appear to be reasonably complete (although I did come across some short comings as construction was underway). There are three styles of pumps provided so you can choose the style that is best for your era.
As is usual the build started by painting the pieces that required it. In this case everything was painted! The walls were painted a gray (on both sides), the windows and doors were painted a deepish red, the roof was painted a grimy black and the floor was painted a concrete color. I chose gray as the main color as I didn’t want a bright, shiny white service station in this town! All the painting was completed with the pieces still attached to their sprues.
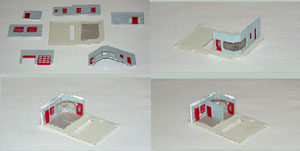
The walls, windows and doors were then removed from their sprues, the attachment points were cleaned up and the doors and windows were test fitted into their respective locations. As it turned out most fit pretty well but only a couple were a perfect fit. Dabs of glue were applied to hold them in place.
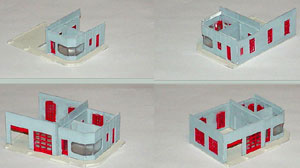
Note: When adding the service bay doors you have a several options. You can leave them off entirely to show both doors being open; you can add one and leave the other off to show one door being open and one being closed or you can add both of them. I chose to add one and then to cut the other one and apply it as if it were almost fully open but not quite!
Windows were next. For all doors and windows (other than the three sided corner ones, the windows were oversized and were simply glued on the back of the frames! The three sided corner was a little different in that, as suggested, the wall was bent into shape prior to inserting the windows.
These three windows actually fit quite well and were even beveled to accommodate the bends in the wall. Of course, the instructions do not mention this so my first dry fit didn’t go too well! Once I realized this was the case it was much easier.
Now it was time to put the walls together. There are actually seven of them! Two interior and five exterior. Since the three sided wall had tabs and slots in the base, this seem the logical place to start! The tabs are quite a tight fit and you may need to scrape any paint that got on them off! Dry fit and then place a few dabs of glue on the base inside.
But where to go from here? The instructions were of no help. All they did was show which wall went where with no recommended sequence for installation. Anyway, I just put them together in what seemed like a reasonable sequence. You can see the sequence used in the pictures. While there were no more tabs and slots they did have small ridges where another wall was supposed to butt up against it so this was a great help.
One advantage was there was never an issue with ensuring the walls were vertical; they just ended up that way. The two roof pieces were removed from their sprues, cleaned up and installed. Once again the instructions made no attempt to explain the pieces actually slid into place from the rear leaving a slight overhang that was actually a gutter! The chimney was the final piece. Apart from a little paint touching up the main building was now complete.
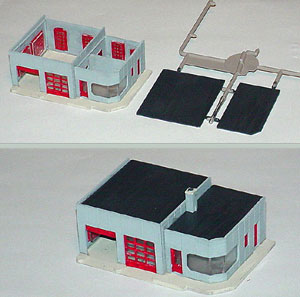
There are two pump islands and six pumps in three different styles so pick the style you want and leave the others. Based on my requirements I only used a single island and three of the older pumps. There were also some signs available. All were painted on their sprues, removed as needed and cleaned up.
Each pump comes in two halves which are glued together. There is a little knob on the base which fits into the pump island. The signs all have separate bases as well. Once they are all glued together a little paint touching up was done and things were pretty much finished. Just some decals and a little weathering!
The decals ended up being the most frustrating part of the entire layout construction up this point! The last time I used decals was back in my early teenage years making model aircraft and those were quite a bit bigger than these!
The instructions say to soak the decals in water for 10 seconds (after cutting out the one needed), let it stand for one minute and then to slide it off the backing paper into position. After destroying a couple of decals I realized these times needed to be paid attention to! Once over that hurdle it took another couple of decals for me to realize that when sliding the decal off its backing it is really best to do it with wet finger tips!
The result was the service station became Jerry’s rather than Al’s! It was just as well they provided three naming options! The decals for the large signs went a little more smoothly (boy, was I happy about that). But the smaller decals for the other signs I just could not handle and so the structure does not have as many decals as I might have preferred. But is has the minimum necessary!
There are a number of products on the market named “Micro xxx” which are all designed for use with decals. Micro Sol is a softener that allows the decal to conform to all the underlying shapes. I found it to be more of a decal solvent!
When the Jerry’s decal had been applied and dried the decal was really obvious on the flat background it had been applied to; it appeared as a “satin” type of appearance. So I used some Micro Flat in the hopes of blending it all in. No such luck. It ended up with a semi-gloss appearance! However, a coating of Dull Cote fixed that!. There are several other Micro xxx products available as well.
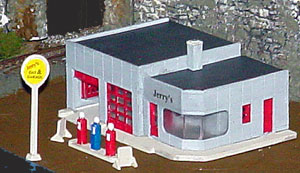
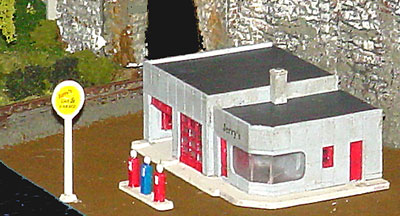
The only other decal I had any success with was the decal for the large sign that stands in front of the structure. These (one on each side, one on the other) slid into position reasonably easily and, once dry, some Micro Set was used to set them in place.
There were a number of other decals but they were all so small I was just unable to handle them correctly! I obviously need more practice for this particular skill!
Note: If you have never worked with decals or it was quite awhile ago you owe it to yourself to get a little practice before attempting to work with the “important” ones. Buy a sheet of decals and practice on something that is finished in the same way as your final product (structure or anything else).
The final structure, with a little black dry-brushing and a slight black wash turned out pretty well! I would have liked some additional decals but it’ll work as it is!
