Article by: Jay Massey
Hi All,
With the looming desire to build my own railroad layout comes the need for a few scenic items. I liked what I saw with Woodland Scenics line of products and purchased a few items. Since N Scale is my size preference and a few things that they produce are more or less generic in nature a little adaptation was in order. This was mostly figured out when I started casting up the tunnel liner forms for my first experimental layout. Since I needed a smooth dozen of them, the Woodland Scenics tunnel liner form seemed to be the cheapest way around this little detail.
It comes made to be able to cast up a rather large form suitable for single or double HO tunnels and with a little cutting of the resulting pieces these can be trimmed down for our favorite scale. Casting up the full sized tunnel form for N Scale is a tad bit wasteful of Hydrocal Lite though. Putting on my thinking cap I came up with the idea of trimming down one of the cast pieces to the size I would need to do either a single or double part. After trimming the first plug cast down to the size required I laid it back in the mold and used it to mark where the form needed to be trimmed with a #11 Hobby Knife blade. Drawing it across the top and bottom of the plaster form held in the mold soon had it cut through, a bit of trimming with a pair of scissors made it into a dedicated N Scale Tunnel Liner Mold. I trimmed a bottom and top piece from the edges of the original leftover parts so I would have the same type of plastic material and Super Glued them in place. This is where I got to with it.
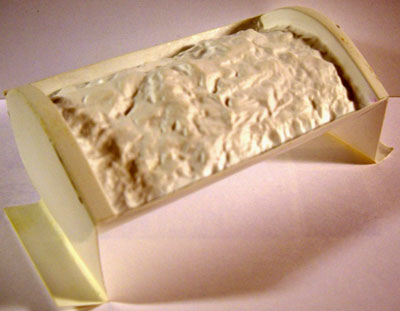
The cast items come out of the mold so that you can form two halves of a tunnel liner to conceal the foam and or plaster underlay of the layout. These can be hinged with a piece of plaster soaked cloth so that you can access the interior to clear out the inevitable wreckage or clean the track with one of those eraser type track cleaners if you don’t make up your own boxcar masonite cleaner to run with your trains.
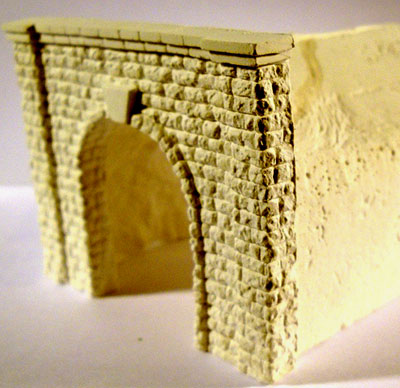
As you can see from a side shot, the interior can be painted and matched up to the rock that makes up the mountain structure of your scenery. These are quite handy to disguise the beginnings and endings of tunnel openings that can be viewed from outside.

Capped off with one of the Tunnel Portals on either end, in this case Woodland Scenics Cut Stone Single type portal, it makes for a pretty nice finishing combination to a tunnel opening. Once colored and weathered it is a very economical and realistic way to deal with tunnel openings.
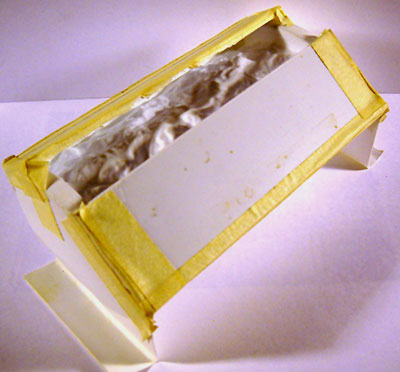
Back to the trimmed mold, I did discover that when pouring these things with the shape of the mold some sort of dam is required over the top of it to keep the plaster from going all over the place. My first effort was a real comedy show trying to keep the plaster in the mold and not all over the counter top.
I used some styrene sheet in .060 thickness to make a upper and lower set of dams that can be taped in place to allow pouring the plaster to fill the mold without having any overflow problems. When it comes time to pour the mold, the first thing to do is to use some wet water (Water and a few drops of liquid dish soap sprayed into the mold for a release agent) to help the cast forms release from the mold once hardened up. I left the small tabs on the bottom of the sides of the mold so that I can tape these down to the countertop to keep the mold steady while I pour it full to the top.
Because of the nature of any type of plaster product, scrubbing it out with a brush and soapy water is necessary after use. Plaster actually forms on the surface of the mold, looking at it in a microscope it looks like tiny hooks and repeated use will soon find ever larger parts of the mold that won’t release properly and tear out pieces from your cast plugs even using wet water. Don’t ever pour this wash water. left over plaster, or even the waste water from cleaning your chosen mixing bowl or stirring tools down the drain. Doing so will soon lead to a visit from your plumber to remove the sections of drain pipe that you have magically clogged with plaster. It does build up over time and repeated events completely clog a pipe just like all those cheeseburgers and fries do to your arteries.
Also, whatever you use to measure, mix and assist with your plaster mixing chores should never be used for any other purpose, especially for cooking. Remember those little hook shapes I mentioned earlier, imagine a stomach getting treated to those, it will soon be time for your doctor to show you all the fun things that ulcers can do for you should you unwisely decide to use the utensils in the kitchen. I usually use saved coffee cans to mix my plaster in with a stirring stick that are actually paint stirrers easily obtainable for free at paint stores. You can clean the plaster off of them by scraping with a knife and once they have been used too many times just toss them, the same goes for the coffee cans used to mix the plaster in. Just throw them away, don’t bother trying to reuse them by washing them out or knocking the dried plaster out. Inevitably you will find little bits of already hardened plaster making your life difficult when you go to make up new batches in a coffee can used before.
