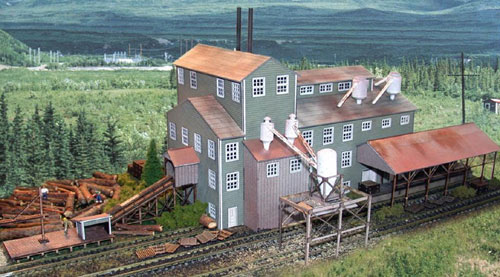
Long Valley Lumber
I first discovered N Scale Architects’ (NSA) Long Valley Lumber kit almost two years ago and I literally drooled over it. However, at the time I wasn’t ready for structures, so I filed it away in my mind for future reference. After completely redesigning my track plan last fall, I once again looked at the kit. I had some reservations about my ability to put something this complex (and expensive!!) together, so I sent an e-mail to NSA asking for a copy of the instructions and more information. Russ Kaufman, the owner and founder of NSA replied promptly. He pointed out a link on the NSA website that I’d missed. It shows what’s in a typical kit (see their website at http://www.thenarch.com/ and click on the link “What’s In the Box”.) He also wisely suggested that I start with their Waterville Switchman’s Shanty kit. I did so and after putting that together with no problem I ordered the accompanying Waterville Freight Station kit. Again, I had no problem putting it together. I had allocated space for the mill on the new track plan and finally ordered the Long Valley Lumber kit. When it arrived I eagerly opened the box and began sorting through its contents.
Six micro-plywood laser-cut plates containing most of the parts. One of these plates has a sticky reverse side covered with paper.
A five-page instruction booklet with many photographs.
Three 81/2 x 11-inch Laser Plate Map sheets that identify the parts and their locations on each plate.
Three full-size View sheets that show highly detailed top, left, right, front, and rear views of the completed kit. You can get an idea of what these look like at http://thenarch.com/products/long-valley-lumber-n. Click on the small box just above the price and you’ll see the Top View sheet for the kit.
A roof paper sheet with sections for each roof part.
A clear plastic glazing sheet.
Two sets of corrugated aluminum sheets
Five metal castings used for the blowers.
Assorted plastic tubing for the smoke stacks and blower pipes.
What follows is my experience putting the kit together. Despite the superb engineering and attention to detail, there are some problems and I’ll identify these as I progress. Obviously, this is not a kit that will go together quickly. I didn’t keep track of the time it took me, but my guess is it was at least 35 hours.
The first task is to paint the various pieces, but don’t even think about opening a paint jar until you’ve gone through the instructions thoroughly at least once. As you do so, refer to the Laser Plate Map sheets, the laser plates themselves, and the View sheets. Doing this will familiarize yourself with all the parts, their location, and the construction sequence. It may take some time, but it’s worth it. While doing this I discovered the first and perhaps the most serious problem. NSA’s published footprint for the mill is 10” x 6” x 6” (length, width, height). The instructions point out that you can use the Top View to see how the mill will fit into your layout and when I did so I discovered that the published footprint is nowhere near large enough. It does not consider the small log ramp enclosure at the right end (viewed from the top), nor the connecting log ramp or the log dock. The published width (or depth as I prefer to call it) of six inches does not consider the sawdust/wood chiploader that is located on the outside siding track. A much more accurate footprint is 16” x 9” x 6” and you should use that as a guideline for the space required.
NSA suggests some colors for the various parts, but color is a subjective thing. I didn’t like NSA’s color choice for the main building (light green) and instead chose a gray and I chose silver for the blowers and pipes instead of white. Whatever your choice of color, it’s a good idea to test it on a piece of scrap wood before painting the kit pieces.
The first construction task is to attach the windows, doors, and their frames to the siding pieces. This is fairly easy to do, but is repetitious and time-consuming. The picture below shows the parts after the windows, doors, and frames were attached.
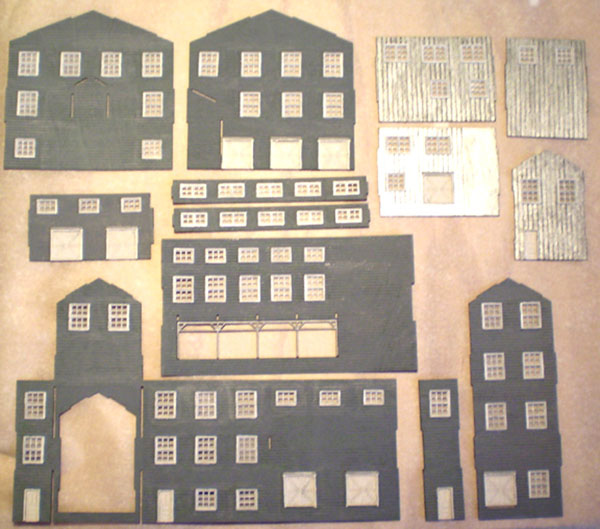
Here’s where I ran into the second problem. The instructions fail to locate any parts. You’ll see things like “glue M2 to M1” or “glue S11-15 to S9.” The larger parts are easy to find on a plate, but smaller ones are more difficult. I spent a lot of time searching through the three Laser Plate Map sheets looking for a specific part. I finally decided to make a list of the parts and the plate where they can be found. I used Excel and sorted the list by part number. This helped a lot because I could tell immediately which plate held the part I needed.
The next task is the assembly of the building. The parts connect together by means of tabs and slots and I found that in most cases the tab was too big or the slot too small and I had to either lightly sand the tab or plane the slot with a hobby knife. As NSA suggests in the “Tips” section of the instructions, it’s a good idea to test fit all the parts before gluing them. After I had the first part of the building assembled, I encountered the third problem. The instructions said to install two roof parts, cut the corresponding roof paper piece from the roof paper sheet and glue it on, and then scribe the lines on the roof paper. I found it virtually impossible to scribe the lines with the roof installed. I couldn’t hold the ruler straight and I was fearful of putting too much pressure on the roof. I think a better procedure is to glue the roof paper on, scribe and weather it, and then glue it into place on the building. It’s much easier to scribe and weather the roof section with it flat on the work surface.
Perhaps the most difficult part of the assembly is getting the narrow corner trim strips on the building. These have the sticky back and it’s very difficult to get them positioned properly and stay in place. I lightly sanded the corners of the building using 220 grit sandpaper and that helped a bit. NSA is aware of this and they have come up with a different corner post design on more recent kits that eliminates these tiny trim pieces. They intend to retrofit the previous kits with this design.
The rest of the assembly is fairly easy, although I discovered another problem when I assembled the log ramp enclosure at the log loading end of the building. I noticed that the Top View has the log trough on the left and the walkway on the right, but the photos in the instructions have them reversed. The same is true for the log ramp. Russ said the trough can be on either side, so be aware of this and use either the Top View or the photos for both the enclosure and the ramp.
One more problem appeared when I began to install the two small blowers on the roof of the sawdust/wood chip building. The tubes running from these blowers to the large blower on the sawdust/wood chip loader are dimensioned as two inches long in the Top View, but the length of these tubes on the Top View sheet is only about 1 ½ inches. Since the Top View sheet is supposed to be full scale, I assumed the tube lengths shown were two inches. Fortunately, I decided to use some scrap wood to test the length of the tubes before cutting the actual tubes from the included tubing. Russ told me the tube lengths shown in all of the diagrams are distorted because the tubes are at compound angles to the roof pieces.You should use the dimensions shown on the Top View diagram.
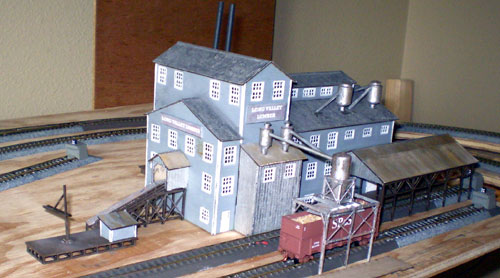
I made two name plates using thin balsa and created the text with a text box using MS Word. I filled the box with a gray color that was as close to the paint color as I could get. The picture below shows the completed model.
Here are three minor typos:
Plate 4 has a piece labeled M22 that should be M27.
The Roof Paper sheet has Roof R1 with two holes for the medium blowers, but the Top View has this roof marked as Roof R2.
Step 10 on page 4 of the instructions says “…by gluing W4 & W10 to W9 …” but this should read “…by gluing W13 & W10 to W9…”
Overall, this is a terrific kit, expensive, but well worth it. Also, the prompt support provided by Russ when I had questions was a big help. The quality and detail are really amazing and if I had to give Russ and the kit a grade, it would be an A-.
