Article By Bryan Catley and his Alligator Lines Copyright ©
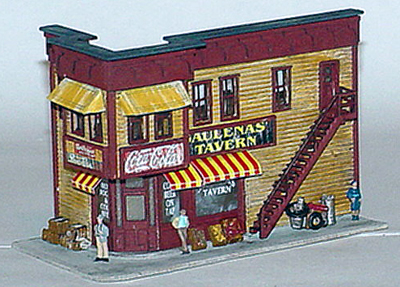
This finished kit has a footprint of 3 ½ x 1 7/8 inches and is, without a doubt, one of the most detailed kit I have constructed to date! The previously constructed “Whistlestop Junction” is the only other that offers any real competition in this regard.
A mix of CA and yellow glues, applied (for the most part) with a toothpick was used during construction.
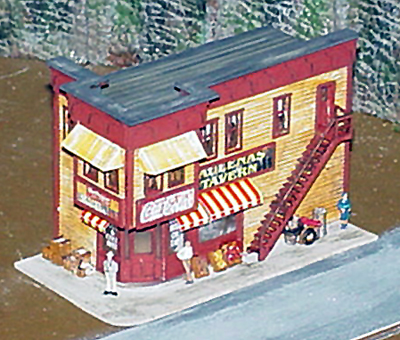
Let me start by saying there is both good news and bad news associated with this kit. The good news is that it is one of the most beautiful kit structures you could wish for and if you have the appropriate space for this building it will look perfect! The bad news is that it also has the worst set of instructions I have ever encountered with any kit I have ever (and I mean ever) constructed.
Rather than detail the errors and omissions immediately I will mention them as I get to that particular area of the construction. Because of the bad news this cannot be suggested as a first time laser cut kit for anyone, regardless of their previous model building experiences. Of course, if you want to buy two and use the first one for experience, then that is up to you!
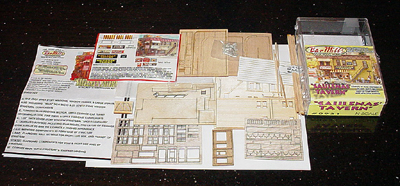
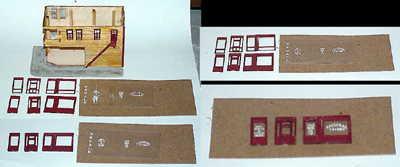
Saulena’s Tavern comes in a clear plastic jewel box with a good portion of it covered by the label! It contains several items including the main building, some roofing, some clear acetate for the window glazing, some frosted acetate with signs already applied, some white metal castings, and several pages of instructions.
Additionally it contains some printed signs and mounts for the side of the building, a “Guide to Better Structure Building” (for any and all structures) pamphlet, a small bundle of larger sticks for wall bracing, a thinner bundle of sticks for the building end posts and a piece of sponge rubber to prevent the contents from shaking around too much.
The instructions come on six sheets of 7 ¾ x 6 inch paper which are stapled together. Side one contains a brief introduction and a list of the contents. Side two contains some pictures and sides three and four contain parts identification. Side five contains a painting guide and the start of the actual instructions. The remaining sides continue with the instructions along with some illustrative pictures.
At first glance they appear reasonably complete but once you get into them you will find them to be incomplete, repetitious, in error and even contradictory! To their credit, on the first page Bar Mills does state that since this was one of the first kits they produced, the instructions “are somewhat crude by modern standards”! Quite an understatement in my opinion!
The kit is a fairly typical laser cut kit; it employs tab and slot construction in a couple of areas and includes a variety of peel ‘n stick trim pieces. These pieces are, for the most part, extremely delicate and will break with the least bit of rough handling. The delicacy and number of these pieces make this one of the most detailed kit I have constructed! It requires lots of time and patience!
I obtained mine from FiferHobby; here is a link to their page for this structure: MF Saulena’s Tavern. The Bar Mills site is here: BM Saulena’s Tavern.
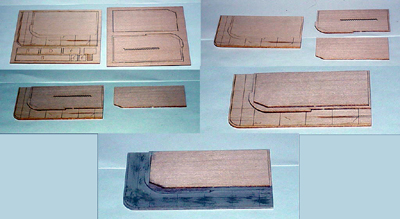
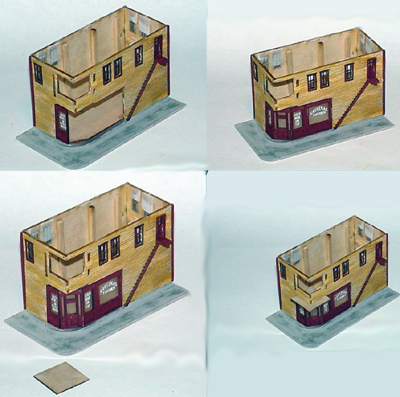
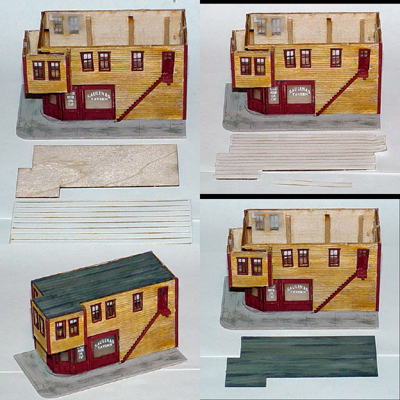
Most laser cut kits are started by painting the walls and windows. While you can certainly do that here, the actual first step is to construct the base of the model which is three pieces laminated together. The base is the largest and includes the sidewalk around the building. The other two layers are peel ‘n stick pieces that form the actual base for the main structure.
They are pretty easy to attach and if you miss on the alignment you can slide the pieces for correction. Just place them lightly first so adjustment is possible if necessary!
Note: Make sure you remove the inside stair risers from the middle piece before doing all this. If you don’t you’ll find yourself in a pretty pickle a little later!
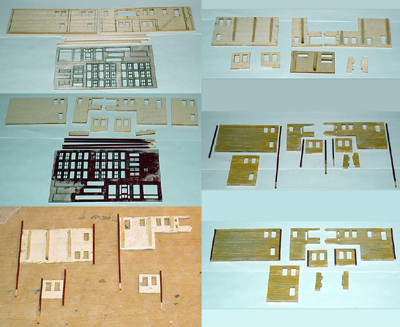
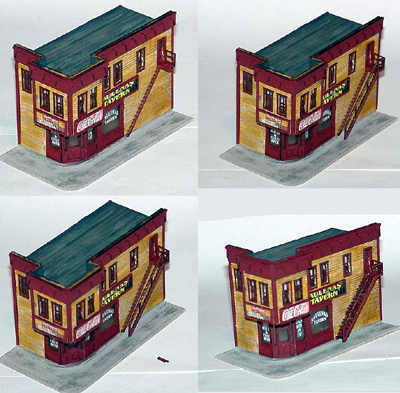
If you didn’t do so previously, you may now paint the exterior walls and windows (and please do so before assembling the building). However, since this is a two story building you probably should brace the walls before painting them. This will definitely help with potential warping. Use the larger square strips of wood for this.
Note: Make sure you apply the bracing across the grain (or vertically in this case). For reasons beyond my comprehension on one end wall I placed them across, or with the grain. Of course this was of no help whatsoever! However, it resulted in no serious problems.
For the walls I applied a coat of light beige. Once dry I dry brushed some yellow and white over the entire surface. Once that was dry I gave the walls a very light sanding! The windows and end posts received a coat of “British Crimson”. Everything received a very light black wash at this point.
Now, I figured, would be a good time to apply the end posts. The instructions stated they were a little larger than the thickness of the walls and should be applied in such a manner that a small lip was formed on the outer edge. (Meaning the back would be flush).
Since the end posts are best applied in a flat position I wondered how this was going to happen with the bracing now in pace! Trying to get them perfectly lined up by hand would be quite an accomplishment. As it turns out the instructions are wrong! The end posts are the same thickness as the walls!
They were glued into place in a flat position from the rear. I just used some wax paper as a base. CA was the glue for this task and if you move things around for a few seconds they will dry with out sticking. Once fully dry the end posts were trimmed to the correct lengths.
Note: The instructions say nothing about which edges of which walls should receive the end posts. Use the photos in the instructions or here to determine the answer to that question.
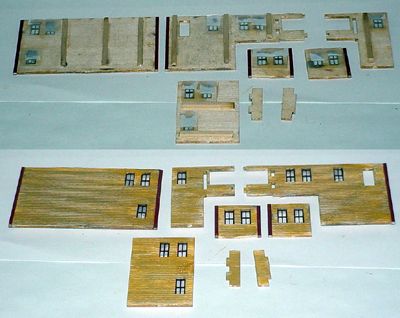
It was now time to insert the windows and the one door into the walls and this is the first place where the instructions totally lost me!
To start they state “There are more windows in the kit than you need… We’ll explain later.” Of course, they never do! Plus the 14 windows required are all there but there are no extras. The extra windows look more like the exterior window frames with cross piece than the windows themselves.
Now, let me quote from the instructions “… insert them (the windows) thru the front of the wall section …” and from a couple of paragraphs later “… insert them from the back of the wall sections.”
So which is it? Good question. Inserting from the back would align them with the front of the wall and would look a little better under the window frame.
Problem is the acetate that comes for the glazing is not laser cut (as it is with a number of other kits) and the windows are not the same thickness as the walls. Since the glazing will cover an area of the rear wall rather just a single window, you can insert from the rear, align with the front and have a gap between the window and glazing or you can insert from the front and have a small indentation in the front but have the glazing directly on the back of the window!
Note: Of course you can always make the effort to cut the acetate to the exact size of each window and have the best of everything!
I chose the latter of the first two approaches and since the windows fit perfectly no glue was used at this point. Small pieces of acetate were cut to cover the windows from the rear and were applied with small dabs of glue with the intent of also gluing the windows in place. Once the glazing was in place some paper shades were cut from the tissue paper that backed the acetate and were also glued into position exposing various amounts of “window”.
The single door (on the second level) was also glued into position. This door leaves a gap underneath for the landing for the exterior stairs which are added later. At this point the inside stair risers were added to the wall along with the landing (underneath the door) itself. Add the stair risers with care and make sure you follow the guides on the wall.
Note: The instructions say the landing is a delicate piece that should be handled with care. They are correct. I ended up breaking mine twice before I got it in place! The problem is the direction of the grain. If the grain had been in the alternate direction it would have been a very stable piece with little or no chance of breakage. However, I did end up putting a little bracing underneath it (on the outside) which seemed to help.
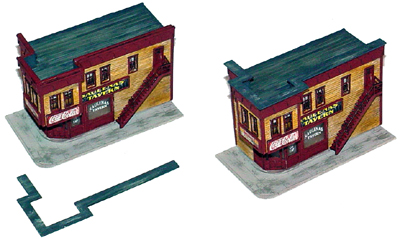
Finally it was time to start putting the structure together!
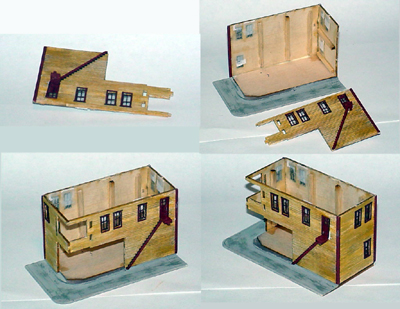
Construction was started with the back wall and the “big” end wall (or the right wall, looking from the front). As is usual, let the glue for the first piece dry a little and then add the second wall. When the two walls are almost dry (but not quite) add the other two walls. I found them to fit beautifully, perfectly in fact. (Of course, being laser cut they should).
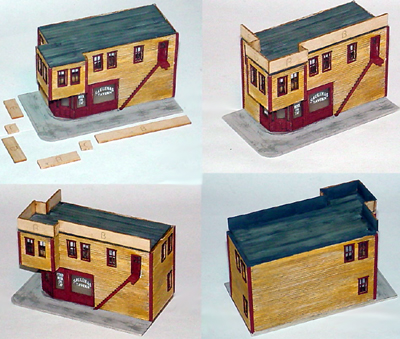
Once the four basic walls are in position it is time to add the store front pieces. These are made up of three double pieces (peel ‘n stick) that go together to form the three walls and some pre-printed frosted acetate for the windows.
Once laminated, trim and add the frosted acetate (which requires some trimming) and you have the three walls making up the store front. The two sides were positioned and the door portion was added last.
Note: As the instructions state the main door piece ends up with small lip around the edge. This is important since it is inserted at an angle and results in a better appearance.
You will note there is a small gap over the main entrance. This is important since the base of the upper wall extensions (a square) slides into this gap. The instructions say to NOT glue this in place. I found gluing totally unnecessary and I presume it is to allow for adjustment. However,I found no adjustment to be necessary.
The second story extension also fit just perfectly!
Note: Please get into the habit of always dry fitting pieces before applying any glue. This is so important. If a piece doesn’t fit the way you want it to you have a chance to trim things so it will!
The next step is the flat roof. This comes with a sheet of roofing strips that are barely enough to cover the roof. No suggestion is made as to whether to apply the strips crosswise or lengthwise. I ended up applying mine length wise and no painting was done until they were in place.
There is nothing out of the ordinary in their application. Each strip is laid so it just overlaps the previous one and they are peel ‘n stick so that is a great help.
Once the roofing strips were applied they were trimmed and received a coat of “Weathered Black”. After that a little white and gray were dry brushed over the roof in the direction of the roofing strips.
It was now time to glue the roof to the building. However, the roof does not rest totally square on the building and neither is it supposed to. And this is where the instructions totally let me down! They state “The roof must align with the edges of the FRONT & LEFT walls of the structure. THIS WILL PROVIDE A SMALL LIP along the edges of the rear & right hand walls. THIS IS NOT A MISTAKE…”.
In fact it is a MAJOR mistake! For the best results in applying the cornice to the roof, the roof top must align with the edges of the REAR and RIGHT walls leaving the lip on the front and left walls! This is very, very important and this is the correct alignment!
These lips are important because the base of the roof cornice is best placed in this lip. The cornice dies not extend around the whole roof, just the front and left sides! Thus the lip is need on those two sides. This alignment also provides a flush alignment for the back and right sides which looks oh so much better!
However, if you decide to follow the instructions (as I did even though I should have known better) all is not lost! The (now) unwanted lip is small and can be pretty much hidden with paint and the cornice base can be glued directly onto the roof edge rather than using the convenience of a lip.
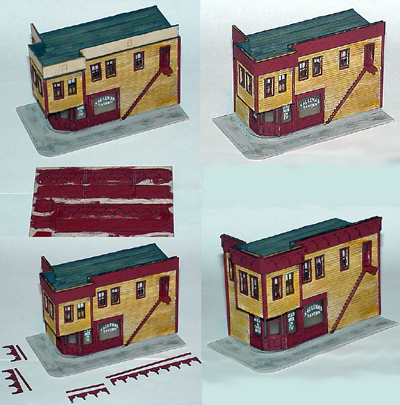
The cornice is applied to the roof in layers. The base layer does not need painting and each piece is stamped with a letter and they are positioned in this sequence. Normally these pieces would be glued into the lip that ought to be there. If you follow the instructions, though, you need to glue them on top of the roof edge!
I also found it necessary to trim a little off one of the smaller pieces. The second layer, which should be pre-painted, is peel ‘n stick and is applied in alphabetic sequence! These pieces all fit without a problem.
This leaves the cornice trim which should also be pre-painted. There are actually two layers of the trim. The larger scalloped design and a smaller raised area that goes across the very top. Once the cornice is finished apply some paint to the edges that are exposed. I also painted the interior of the cornice the same black the rest of the roof.
At this point there are two major parts of the construction left. (Although there are still a number of smaller steps necessary). The flat roofing strip over the cornice and the stairs. The former is easy and the latter is probably the most difficult part of the kit since each stair tread needs to be applied individually.
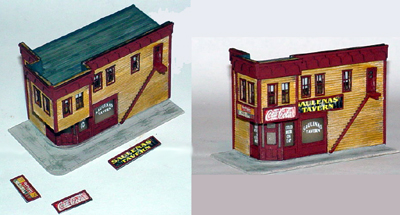
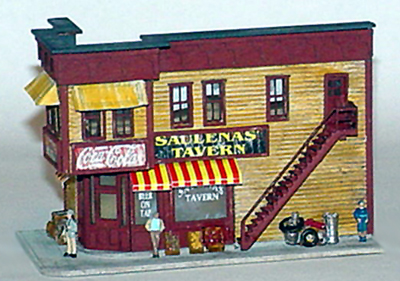
However, before tackling them I decided to add the external signs to the building. I thought that installing them before the stairs or the final roof piece would make the job a little easier.
The signs consist of the actual sign, some peel ‘n stick backing and a frame. To start, the signs received a light sanding to simulate some age. Be careful, a heavy handed sanding will render the signs useless.
The signs were cut out and applied to the backing. The frames (also peel n stick) were applied to the fronts. The signs were then applied to the building sides with a couple a small dabs of CA glue.
Note: The signs also include a “Rooms 25c” sign which I chose not to use. It would have made things too era specific for me!
You can do the roofing strip (lays over the cornice) and stairs in any sequence and I chose to do the stairs first. Before starting, all the pieces were pre-painted.
The back railing of the landing (in front of the door) was first. There are no slots or printed guides; you just position and glue! The front railings and stair risers are next. The rails are very thin and fragile but come out of the container sheet very easily.
Note: When pre-painting be careful not to use too thick a coat of paint! Most pieces are only held in position with two or three tabs that need cutting. They then come out very easily. Too much paint can end up “gluing” them in position making them more difficult to extract!
The only guides for installing the side railing and risers are the landing and the rear support you have just positioned. However, you also need to ensure the two risers are correctly aligned or the stairway will look pretty strange and posibly lop sided!
If you have done a good job on the landing and rear railing, aligning the out side rails with these will automatically provide the correct alignment of the risers. Otherwise you will need your eyes to guide you.
Once the side railing is securely in place you can start on the treads! Several of them are notched and are placed adjacent to the vertical risers of the outside railings. These are the first ones to be applied and they help hold the outside railing in position for the remaining treads.
Note: As you can imagine the individual treads are very small and quite difficult to handle. This is one case where some needle nose tweezers are absolutely mandatory!
I found the easiest way to insert the treads was to hold them vertically in the tweezers and then come down from above. When at the correct level rotate the tweezers and place the tread into position. After a few times it becomes relatively easy even if time consuming!
Note: The treads are peel ‘n stick but there is very little surface for them to adhere to. The instructions, and I, suggest a little dab of glue to fix them in place. For me, I did this every two treads. A tiny dab of glue applied with a toothpick (which was changed quite frequently).
Eventually they were done and they look very good (even if not perfect). Well worth the effort. The kits supplies more treads than are needed in case you loose one of these small pieces. Luckily I never lost one although I did drop a few!
Note: If the stairs do not turn out to be perfect do not worry. The stairs are very small and no one will be looking at them from that close anyway!
Once dry the shiny surface of the CA glue dabs was showing in spots. Some touch up paint and some Dullcote took care of that.
The roof strip was pre-painted in the same roof black and glued into position using some yellow glue. This glue allowed me to position the strip exactly as I wanted it. Once in the correct position I applied a weight until the glue had dried. In this case it was left overnight.
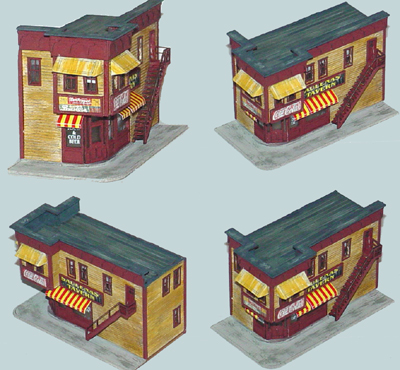
Not a lot left to do at this point! Just the awnings and some white metal details!
There are two sets of awnings. Some yellow and red stripped ones for the lower level and some plain white ones for the upper level. The yellow and red ones received some light sanding while the upper ones received a coat of light beige followed by some yellow dry brushed on (much like the walls).
They were then scored (for the creases) and cutout. The panels were creased in the appropriate places and glued into position with a small bead of CA glue.
Note: No attempt was made to make them perfect. This is an older building and things will not be perfect!
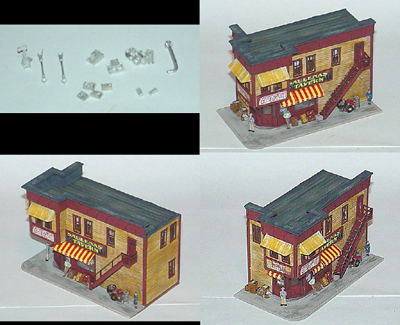
The kit provides quite a few white metal castings and you wont need them all (although I suppose you could use them all if you really wanted to)! After selecting the ones I wanted they were given a base coat of light brown to hide the metal. Additional paint was applied after this step. Black for the tires, differing shades of brown for the packing cases, aluminum for the trash cans, along with some red, yellow and green for the crates of fruit, etc.
Note: A very, very small paint brush was used for this task!
Once dry they were glued into position using dabs of CA glue. The final step was to add three people (not supplied with the kit). One was a man lounging against the wall next to the fruit crates while another man and woman were just standing around.
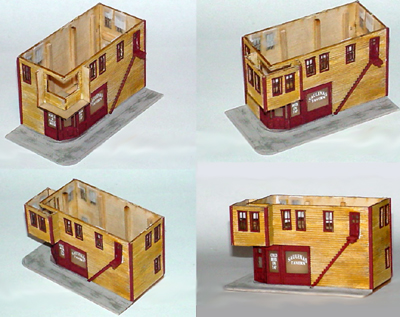
Overall this turned out to be a great kit that results in a beautiful looking older tavern. You just have to get by the instructions; if you can do that you will enjoy the results!
One final note, I have given the instructions that come with this kit a deserved hard time but this doesn’t mean you should ignore them! There is lots of good information in them. Just use a little common sense and use them in conjunction with this write up (or another). I have to repeat though; do not attempt this kit as a first time laser-cut kit!
