Article By Bryan Catley and his Alligator Lines Copyright © Bryan-Catley
Bar Mills’ “Whistlestop Junction”
Scenery Project 13 (Part C) needed a depot (along with a hotel/bar/rooming house). I had a built-up depot from Cornerstone but decided I wanted something a little better looking! What I ended up choosing was the Bar Mills “Whistlestop Junction” depot laser cut kit. Now it has been completed I am really glad I made that decision!
This finished kit has a footprint of 3 ½ x 2 ¾ inches and is, without a doubt, the most detailed kit I have constructed to date!
Here we will just discuss the kit and the actual construction of the depot. A mix of CA and yellow glues, applied (for the most part) with a toothpick was used during construction.
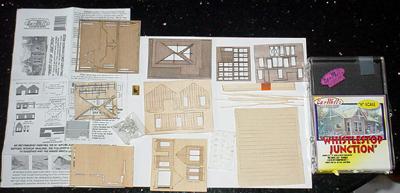
The Whistlestop Junction depot comes in a clear plastic jewel box with a good portion of it covered by the label! It contains several items including the main building, a couple of fences, some white metal castings, and a sheet of instructions. Additionally it contains one printed advertisement for the side of the building, a sheet of pre-cut acetate for windows, a “Guide to Better Structure Building” (for any and all structures) pamphlet, a small bundle of sticks (I’m guessing for wall bracing), several sheets of printed (and embossed) roofing shingles and a piece of sponge rubber to prevent the contents from shaking around too much.
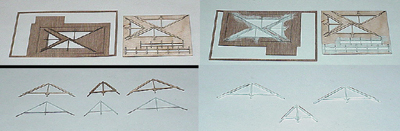
The instructions are made up of a single sheet of 10 x 6 ½ inch paper, using both sides. Side one contains the introduction, parts identification and the start of the instructions for door and window assemblies. Side two completes the door and window instructions and continues with the remainder of the instructions. It also specifically states the back of the (peel ‘n stick) roofing shingles contains instructions for dealing with these. They don’t have any such instructions! But it shouldn’t be an issue if you have used this kind of roofing material before.
The kit is a fairly typical laser cut kit, it employs tab and slot construction in several areas and includes a variety of peel ‘n stick trim pieces. These pieces are, for the most part, extremely delicate and will break with the least bit of rough handling. The delicacy and number of these pieces make this the most detailed kit I have constructed to this date! It requires lots of time and patience!
The Bar Mills site for this kit is here: Bar Mills’ Whistlestop Junction.
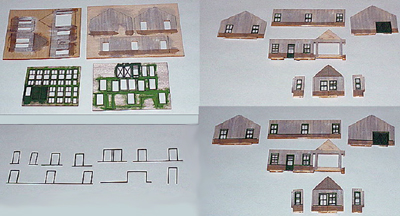
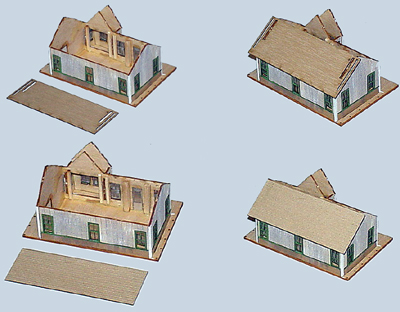
As is usual with this style of kit, the building is started by pre-painting the pieces before removing them from their holders. Remember that for this kit, a few of the pieces require painting on both sides.
Note: The instructions suggest bracing the walls before painting (to help prevent warping) but do not offer any other details in this regard! They do provide some wood strips that may be used but no mention is made of these at all.
The walls have a distinct upper and lower area and the upper was painted in light beige while the lower received some dark beige! The windows, doors and “hip” railings (which provide a clean divide between the upper and lower walls) received a dark green coating. White was reserved for the fences and the roof trim (although the corners of the building also received a coat of white once the building had been completed).
Some light weathering was also applied at this time. Mostly in the form of a black wash and a little dry brushing with a darker brown.
Actual construction is started by adding the windows and doors to the walls. Usually I construct the windows and doors in their respective openings but in this case I had to pre-build them and then insert them into the openings. This was necessary since the windows were just a tad too small and wouldn’t stay in place without a little dab of glue! (Much better than being a tad too big though)!
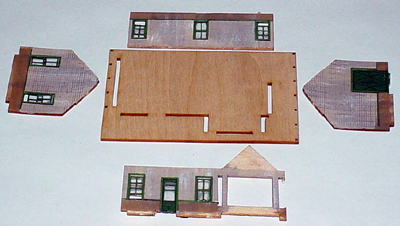
Note: While working with front of the main building I really wished I had used some bracing! Not for warping but for strength! The grain of the wood is such that it splits, oh so easily! I did some bracing after the fact, and it is visible in a couple of the pictures. Be careful not to extend the bracing below the floor level!
Once the windows and doors are in place, the external frames and “hip” railings may be applied. These are all peel ‘n stick and the stick provides enough leeway to allow for adjustment after application but do it quickly. I found a hobby knife and my needle-nosed tweezers worked very well for this task. Once again, these pieces are very thin and fragile!
Note: I had planned on adding the provided sign to the wall with the double door at this point. The sign was retrieved from the case and positioned on my work surface for a little sanding (to give it a more weathered look) and it just vanished! I have absolutely no idea what happened to it! As a result there is no advertisement on my depot!
Before starting to glue the walls to the base, make sure you dry fit everything you possibly can! If it becomes necessary to adjust some of the tabs, it is much easier to do so now! This includes the roofing pieces.
The instructions provide no information about the correct sequence to put the walls together. However, a little thought indicates one should start with the front wall (main building) and then the two end pieces followed by the back wall (which has no tabs). This works very well; just be sure you add each wall before the previously installed connecting wall(s) have fully dried. This ensures you have little bit of leeway for adjustment if necessary.
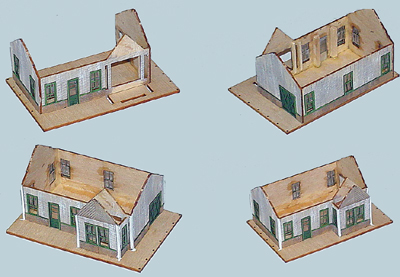
The three pieces making up the lobby are next. The side pieces first and then the front. The basic building (except for the roof) is now complete!
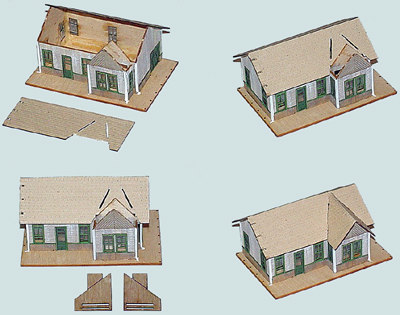
The first thing you will notice is the bare ends to the walls! They need to be touched up and you can use the wall color(s) used before or a different color. I used white and was concerned about how straight my edged might be. A very small brush was used and the paint went on very smoothly and easily.
This left the roof for the main structure. As I said, the kit provides peel ‘n stick shingles but despite the statement that instructions are on the back of these shingles, none are actually there! Now, if you have never used this type of roof covering previously this might be a problem but if you have, then you already know the correct technique for applying them.
The first thing to do is a dry fitting of the two main roof panels to double check the fit.
Note: Each roof panel has two slots at each end. The inner one is for the tabs on the walls and the outer one is for the roof trim – more on this in a little bit. Just be sure you use the inner ones here!
The next question to ask yourself is do you want to apply the shingle strips before you attach the roof or after? You can do it either way but I have always found that doing it before applying the roof panels is so much easier! Of course, you do end up covering the slots so attaching the panels to the walls is a little more difficult but if you have done the dry fitting thing previously it shouldn’t be much of an issue at all.
Starting with the back roof panel the shingle strips were applied one by one with each strip slightly overlapping the lower strip. In other words you start at the bottom and work your way up! The strips are made the correct length for the main building’s roof but you may still find the need to trim the edges when you are finished. Use a very sharp hobby knife, razor blade or scissors for this task.
Be careful! The shingles are quite delicate and a bad pull with your trimming instrument can ruin your effort!
The back roof panel was glued in place leaving the front panel as the next step. This created a bit of a quandary for me since it also included the space for the roof over the lobby area which is 90 degrees to the main roof. I had only handled this scenario once before (Angelo’s Place) and I wasn’t quite sure of the best way to handle it.
In the end I simply applied the shingle strips across the entire roof but trimmed the area for the lobby roof every two or three strips using the provided slots as a guide. This actually worked very well.
The two roof pieces for the lobby received much the same treatment with the trimming being guided by lines previously drawn on them (based on the tabs). These two pieces were then glued into position and the depot was starting to look pretty good!
To be honest I was surprised as to just how good the roof joins between the lobby and the main building turned out. I had been thinking a little filling might be necessary but not so!
This still left the peaks of both roofs where the gap was a little wider than I had expected. Well, as it turns out each sheet of shingles has one piece that is used to cover these peaks! They worked very well with my only issue being the “stick” was not as quite as firm as I would have liked!
A little glue would have helped but I elected to use some Dullcote for that job. It work pretty well but not as good as some glue would have!
Note: The kit comes with four of the sheets of shingle strips but I actually only used one sheet plus a couple of strips from a second sheet. The rest will definitely be saved for later use!
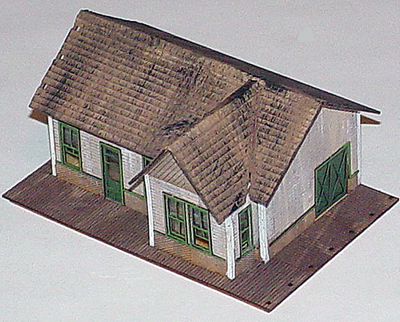
The roof also needed some weathering and I ended up going a little heavier handed than I had intended but it seems to have worked out pretty well. A light strip of brown paint down the join between the lobby and main roofs, some black wash, some brown dry brushing followed by some black dry brushing finished the job.
The next thing was the roofing trim or “end-gables” at each end of the main building and at the front of the lobby. Three triangular trim pieces that fit into ends of the roof! Each is composed of two pieces, a back piece with tabs for the outer slots on the roof and the peel ‘n stick outer pieces that were pre-painted in white. It is necessary to very carefully remove the six pieces from their container sheets, remove the “peel” from the front pieces and to, again very carefully, stick the front pieces to the back pieces.
Note: Before doing this dry fit the back pieces into place so you won’t have any surprises!
Once you have front and back stuck together you can glue the three pieces of trim into position. Be aware there is not a lot of room for fingers and a pair of tweezers is a very handy thing to have!
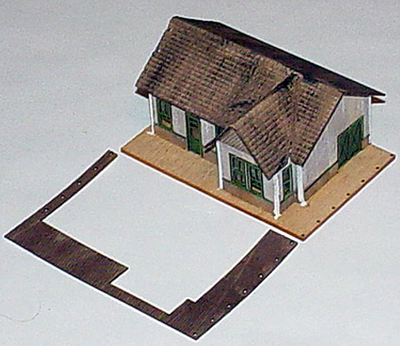
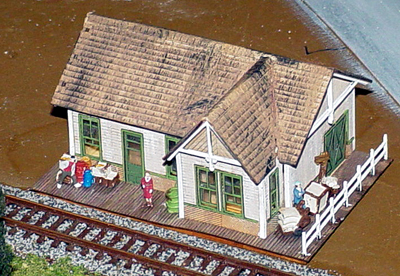
The porch flooring is a single piece of wood that has been scribed to represent wooden planks. It is also of the peel ‘n stick variety. Once again it was given a light black wash before being removed from its container sheet. It fit very well and the holes for the fence posts lined up exactly. Once the fit had been checked the backing was removed and the flooring was pressed into position. The “stick” didn’t hold quite as well as I would have liked but a night with weights resting on the ends and wherever else possible, seemed to cure that!
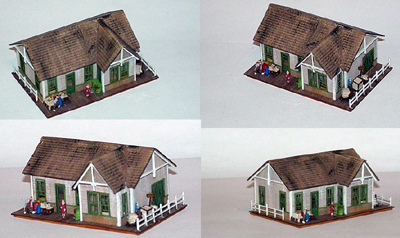
This just left the two fences but before adding them it seemed appropriate to add some of the white metal castings and a couple of figures. Adding them now would be a lot easier than waiting until the fences were in position! Painting them came first, of course. A very thin brush was used and I actually found it quite easy to paint the trim and the details. Some touching up was necessary but overall it went very smoothly. A little CA glue held the pieces in place.
It was finally time to add the two fences! They had been painted previously but the edges still needed a little paint once they were removed from their container sheets. They fit quite snugly but required minimal pressure to set them in place. Small dabs of glue made them permanent!
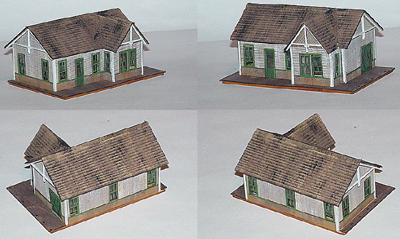
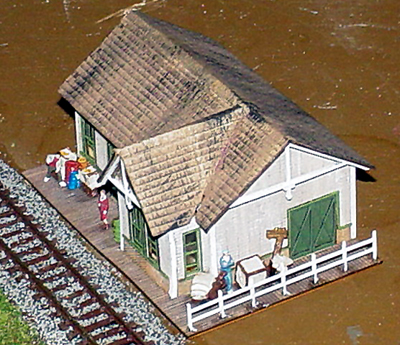
The main structure was now complete!
The basic structure is a pretty straight forward build but there are a large number of very small and delicate pieces that require extreme care. Overall the pieces go together very well. As noted, the windows are just a tad small, however.
The instructions are definitely lacking but will suffice if you have already built a few of these kits. Because of this and the large number of small parts I would not recommend this as a first time laser cut kit.
Overall this is a great kit that results in an incredible looking depot!
