Article By Bryan Catley and his Alligator Lines Copyright ©
Bryan-Catley
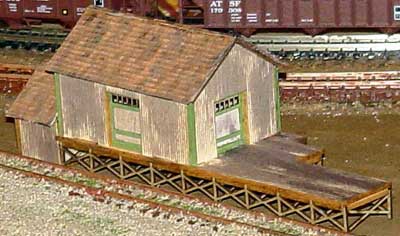
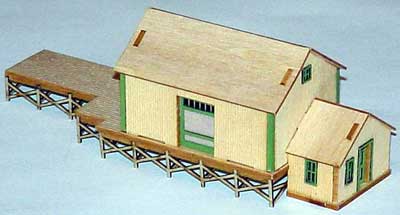
Northeastern Scale Models Small Trackside Structure (STS) Freight Depot was the fifth laser cut kit for the Alligator Lines. Here we will discuss the kit and the actual construction of the depot. The glue used was standard white glue applied using a toothpick.
The kit is (almost) complete and requires no scratch building skills with everything you will need to complete it being laser cut. The only item missing is the roof covering.
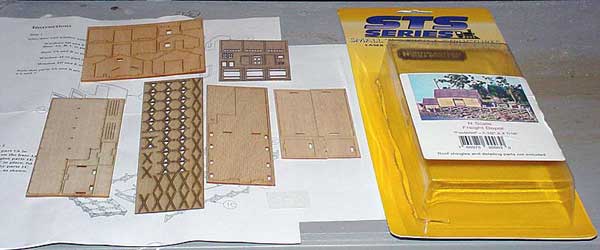
It is a simple and straight forward kit to put together although it does have a few small pieces to work with. If it were not for one thing I would go so far as to say this would make an ideal starter kit. That one thing is the very sparse instructions. They are nothing more than a guide and only work reasonably well if you have already put together a laser-cut kit or two!
One thing that would cause problems for a first-timer is the four wall end posts. The instructions only show two of them in the diagrams and never even mention them in the text! If you didn’t know what to do with them you would be lost!
Basically the kit is of the tab and slot variety, except for the wall corners. As with other laser cut kits you need to prepare and paint it before any construction. In this case I decided to use the same color scheme I used with the Passenger Shelter; green trim and natural wood elsewhere and then some weathering on completion.
As I mentioned, the instructions say nothing about the four end posts for the walls. The diagrams imply to put them into position after the walls are in place. A much better method is to do it now, before anything else! Just glue one to each end of the side walls. (You could also use the end walls). Glue them while flat and then slide them around a bit to prevent them from sticking to the surface beneath. Don’t forget to paint the end edges once the glue has dried.
Doors and windows are completed and glued to the walls as appropriate next.
Note: When positioning the wall posts and the doors take care to allow enough space at the bottom for the walls to fit in the base correctly. If you don’t, you’ll find yourself having to trim the bottom off them after they have been glued into place!
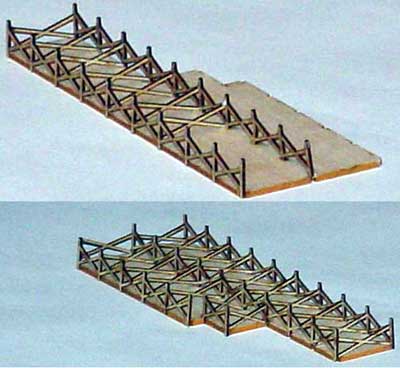
Three long pieces of supports go along the length of the base and a number of X’s make up the cross pieces. The long pieces are positioned first, into the holes already cut in the base. The cross pieces, even though there are quite a few of them go into position easily. A little glue on the two base ends of the X and the use of tweezers to position them. When the glue is partially dry add a little glue at the top ends of the X.
Note: When inserting the long pieces into the base, make sure they go into the receiving holes all the way! If they don’t you will have an uneven base and you’ll have to trim the ends off one of the long pieces! If you find yourself in this situation, nail clippers work very well! Also, don’t be too concerned with the alignment of the cross X’s. Once the depot is in position on your layout they will be very difficult to see.
The base for the main depot is now glued to the main base you have just completed. It is just a little bigger so there is a very small overlap all the way around. Just be careful not to leave any glue in the slots for the walls. It will also be a good idea to place a weight on top until dry!
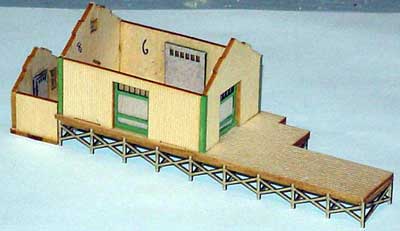
Now add the four walls and the small office/shed on the end. Do not glue the roof panels into place just yet, unless you intend to just paint them (in which case that should already have been done). The four roof panels do have slots to ensure they are positioned correctly.
Note: I had to trim about 1/32nd of an inch off one of the smaller roof panels in order for both panels to fit correctly. The first time I’ve found a laser cut piece that wasn’t quite right!
As with other kits the instructions say to paint the roof or apply any covering of your choice (not included). I used the same shingles that were used for the Platform Shelter and they were positioned using a similar method. The roof peaks was finished as they were for the shed and the shelter.
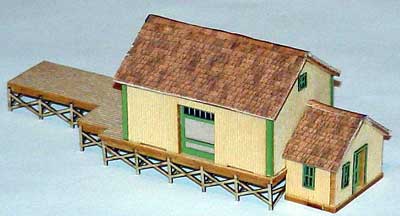
At this point a little weathering was applied to the building. A black wash was applied to the walls and roof. The depot was now finished!