Kit-Bash an N-Scale Sand House and Sand Tower
Gary Wolfe
My current N-scale layout represents a fictional Boston & Maine branch-line of the transition era (early 40’s to early 50’s). Recently, I kit-bashed/scratch-built a coaling tower based on the old Heljan n-scale kit.
Once my coaling tower project was completed I decided to use the same method to build a small sand house and sanding tower. (Small is key as my layout has limited real estate available to add new structures.)
In my most recent order from Fifer Hobby Supply, I bought a ModelTech Shed #3 to use as a basis for my scratch-built sand tower.
This beautifully sculpted, little brick building already has air intake grills and exhaust vents …. a perfect environment for sand drying equipment. No need for a chimney! Despite the wealth of detail, the shed is very tiny; just 1” W x 3/4” D x 1” H.
Everything other than the shed and a Plastruct ladder on the sand tower is scratch-built, using Evergreen plastic products and brass wire.
What I Needed for the Project
In addition to the ModelTech Shed #3
Link to buy shed
I used the following materials:
Evergreen Sheet Styrene
(2060 V-Groove); 0.060″ spacing; 0.020″ thick
(9010 Plain); 0.010″ thick
(164 Strip); 0.080″ x 0.080″
(134 Strip); 0.030″ x 0.80″
(175 Strip); 0.100″ x 0.100″
(210 Rod); 0.030″
Plastruct
(90421) ABS Ladder, 3″, 1 pair
Brass Rod
0.04”
0.02”
Tools
Xacto knife with #11 blades
Xacto small file set
Xacto steel square
Pin vise and micro-size drill bits
Steel rule
Xuron flush cutter
Cutting surface
Testors glues (liquid and gel)
Walthers Goo rubber adhesive
Assorted Tamiya, Citadel, and Testors acrylic modeling paints (brush and spray)
Assorted size paint brushes
For this build (as with my earlier coaling tower) I did not use detailed plans. I researched the Internet for many images of transition era sand houses and sand towers and borrowed design features as needed.
Based on the different Web views I found, I then built a series of sub-assemblies, test fitting at every step to ensure correct alignments.
How I Built It
The sub-assemblies were:
1. ModelTech Shed #3 Modifications (See Photos 1a and 1b)
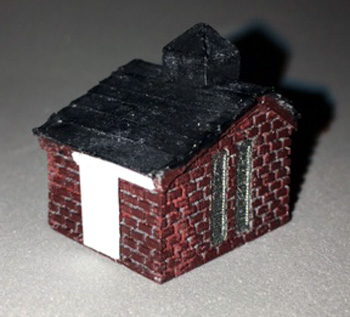
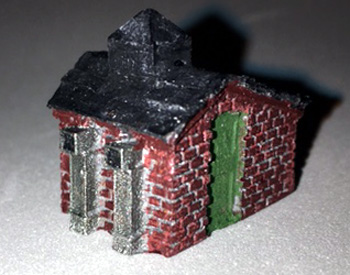
1a and b. Modified ModelTech Shed #3 with added access door.
The only modifications to the shed were to repaint some trim details: medium green door and metallic gray air intake grills and exhaust ducts. I also dry-brushed the bricks to a slightly darker terracotta color, and the roof to a slightly darker gray. Last, I added a “sliding” green barn door to give workers in the the shed access to the wet sand bin.
2. Wet Sand Bin (See Photo 2)

2. Wet sand bin sub-assembly.
The wet sand bin is the same width as the the shed and has a footprint 3/4” W x 1.5” L. The bottom of the bin is Evergreen 9010 plain sheet plastic.
The bin has three walls (the shed itself is the fourth “wall”). The walls wrap around the base and are just tall enough to fit under the eaves of the shed. The walls are Evergreen 2060 V-Groove with the grooved side visible. The front and rear walls are each 7/16” H x 1.5” W. The right side wall is 7/16” H x 3/4”.
After the glue dried, I slightly trimmed the open side of the bin so it would fit snugly against the side of the shed where I previously added the sliding barn door.
Next, using Evergreen 164 Strip, I cut vertical reinforcing posts to mount on the outside of the sand bin. Nine posts are the same height as the bin: 7/16”: Three mount on the front of the bin, equally spaced; three mount on the back; and three mount on the right sidewall.
Four additional posts, each 9/16”long, accommodate reinforcing rods that run across the top of the bin. Two long posts mount on the outside front wall of the bin, equally spaced between the short posts. The other two long posts mount on the back wall.
Next, measuring 1/16” down from the top of each tall post, I drilled a 1/32” Dia. hole from front-to-back. Then, I cut two 1.0” pieces of 210 Rod and inserted each piece through the holes to create the reinforcing rods. This completed the sand bin sub-assembly.
3. Sand Tower (See Photo 3)

3. Sand tower sub-assembly
The sand tower, viewed from the side, is essentially in the form of a right triangle with the long vertical uprights on the track side of the tower. The base of the triangle comprises the horizontal base beams of the tower.
The tower has a cylindrical dry sand storage canister made from 3/16” Dia. Evergreen rigid plastic tube cut 5/8” L. The top of the canister is sealed with a 3/16” Dia. disk of Evergreen 9010 plain plastic sheet. The bottom of the canister is fitted with a 3/16” Dia. plastic cone that I found in my spare parts box. Once the canister was complete I drilled a 1/32” Dia. Hole in the center of the top where the sand transport tube connects. I also drilled a 1/16” Dia. Hole in the tip of the cone where the sand spout mounts.
The sand canister fits between two 2 7/8” upright posts made of Evergreen 164 strip. The top of the canister is flush with the top of the uprights. At the bottom ends of the uprights I attached two 1” L pieces of Evergreen 164 strip at a right angle to the uprights to form the base beams. About 1/16” down from the top of each upright, I drilled a 1/32” hole to attach rigging threads to support the sand spout.
Then, using Evergreen 134 strip I attached two long diagonals extending from the outer ends of the base beams to a point about 2/3 of the away up the two uprights. Next I fitted cross braces between the uprights and extended the cross bracing to add support to the two diagonal braces.
About 1/8” above the top of the diagonal bracing I added a maintenance scaffolding 5/8” W x 1/2” made of Evergreen 2060 V-Groove. The floor of the platform was drilled and carved so that it would slide down over the sand canister and rest level with the bottom of the canister, sitting on small cross beams made of Evergreen 134 strip. I then surrounded the platform with safety railings of Evergreen 210 rod.
For worker access, I added a 3” L Plastruct 90421 ladder extending from the outer ends of the base beams to the top of the sand canister.
Working with 0.04” brass rod I cut and bent a sand spout about 1 1/8” long. (The bottom 1/8” of the spout is bent downward slightly. The top 1/8” is bent up so that it can be inserted and glued (with Walthers Goo) into the hole in the conical bottom of the sand cannister. I test fit the spout to make sure steam locomotives on the service track had enough vertical clearance to easily pass underneath. This completed the sand tower sub-assembly, except for rigging and final details.
4. Base (See Photo 4)

4. Base sub-assembly
The top of the base is a pieces of Evergreen 2060 V-Groove, measuring 4” x 1 5/16” with grooves parallel to the long dimension. Underneath, a frame of Evergreen 175 Strip provides rigidity.
5. Putting the Sub-Assemblies Together (See Photo 5)

5. Completed sand house and tower, unpainted.
I cemented the sand tower sub-assembly to the left side of the base, positioned so that, when the base was placed next to the service track, the lower end of the sand spout would be centered above the track.
I temporarily placed the ModelTech shed about 5/8” to the right of the sand tower and drilled in the base a 1/32” hole abutting the shed.
Then, using 0.02” brass rod, I formed the sand transport tube and cemented it in place (with Walthers Goo). The upper part of the tube connects to the hole in the top of the sand canister; the lower part if the tube fits into the hole beside the shed.
Leaving the shed in place, I cemented the sand bin to the right side of the base, flush with the right side of the shed (where I had previously added the sliding access door).
Next, I removed the shed from the base so that I could paint the rest of the sand house/sand tower.
6. Painting (See Photo 6)

6. Completed sand house and tower, painted.
I spray-painted the entire assembly (except the already-painted shed) with solvent-based Testors flat medium brown.
Once the paint was dry I detail-painted the sand canister, sand spout, and sand transport tube with Tamiya acrylic metallic gray.
I then painted the horizontal deck surfaces on the base and the maintenance scaffold with Tamiya acrylic buff.
7. Final Assembly and Rigging (See Photo 7)

7. Sand house and tower on the layout. Note Stewart single track sand tower on left and previously scratch-built coaling tower on right.
Once the painting was complete, I attached the shed (using Walthers Goo) to the base with the right side flush to the sand bin.
The, using a metallic gray thread, I added the rigging to support the sand spout, as well as additional lines that would allow workers to position the spout.
Finally, I cut a piece of tan craft foam 5/8” W x 1-3/4 ” L. Then I bowed the piece of foam slightly and inserted it into the sand bin to create a convincing sand pile.
At this point the sand house was finished and ready for the layout!
